When you’re building cool stuff with STM32 microcontrollers, finding and fixing issues is like being a detective for your gadgets. One handy tool you have in your toolkit is Serial Wire View (SWV). In this beginner-friendly guide, we’ll explore what SWV is, why it’s cool, and how you can use printf on STM32 using ITM+SWO to peek inside your STM32 projects.
What is Serial Wire View (SWV)?
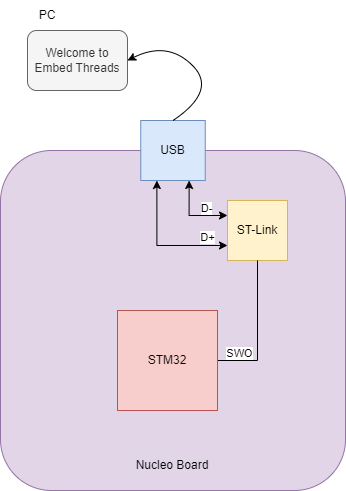
Serial Wire View, or SWV for short, is like having a secret camera inside your STM32 microcontroller. This camera, or “Single Wire Output (SWO) pin,” lets you watch what’s happening in real-time, helping you understand how your program is running.
How Does Serial Wire View (SWV) Work?
STM32 microcontrollers use technologies like JTAG and SWD for debugging and tracing. Tracing helps you see real-time activities inside the CPU. The Instrumentation Trace MacroCell (ITM) is a tool that sends software-generated debug messages through a specific signal called Serial Wire Output (SWO).
This ITM support is available in newer Cortex-M3/M4/M7 microcontrollers.
The protocol used on the SWO pin for exchanging data with the debugger probe is called Serial Wire Viewer (SWV). The SWV protocol defines 32 stimulus ports, like “tags” on SWV messages. These channels help categorize diagnostic data. For example, channel 0 can be for text data (like from printf), and channel 31 for RTOS events.

ITM Functions
The ITM stimulus registers, standardized by ARM, are located on address 0xE0000000 (port 0) through 0xE000007C (port 31). Enable ITM tracing and write data to the corresponding register.
The CMSIS-Core package for Cortex-M3/M4/M7 cores provides necessary functionality to handle the SWV protocol, such as the ITM_SendChar() routines for sending characters using the SWO pin.
__STATIC_INLINE uint32_t ITM_SendChar (uint32_t ch)
{
  if (((ITM->TCR & ITM_TCR_ITMENA_Msk) != 0UL) &&      /* ITM enabled */
      ((ITM->TER & 1UL               ) != 0UL)   )     /* ITM Port #0 enabled */
  {
    while (ITM->PORT[0U].u32 == 0UL)
    {
      __NOP();
    }
    ITM->PORT[0U].u8 = (uint8_t)ch;
  }
  return (ch);
}
Advantages of Serial Wire View (SWV):
Live Feed of Microcontroller Activity: SWV shows you in real-time what’s happening inside your microcontroller. It’s like watching a live broadcast of your program’s performance.
Efficient Issue Spotting: With SWV, you can quickly find and fix issues in your code. It’s like having a detective tool that helps you solve problems faster.
Unintrusive Monitoring: By using the dedicated SWO pin, you can watch the program without slowing it down. It’s like having a camera that doesn’t disrupt the movie it’s recording.
Limitations of Serial Wire View (SWV):
Processor Compatibility: SWV works on Cortex-M3 and newer processors. Older processors in the STM32 family may not support SWV.
Uni-Directional Communication: SWV mainly allows data to be sent from the microcontroller to the debugger. For two-way communication, additional methods may be needed.
How to Use Serial Wire View (SWV)?
Setting Up Your Project
- Start a new project with STM32F401RETx through CubeMX.
- Note the System Clock Frequency, like 84MHz.
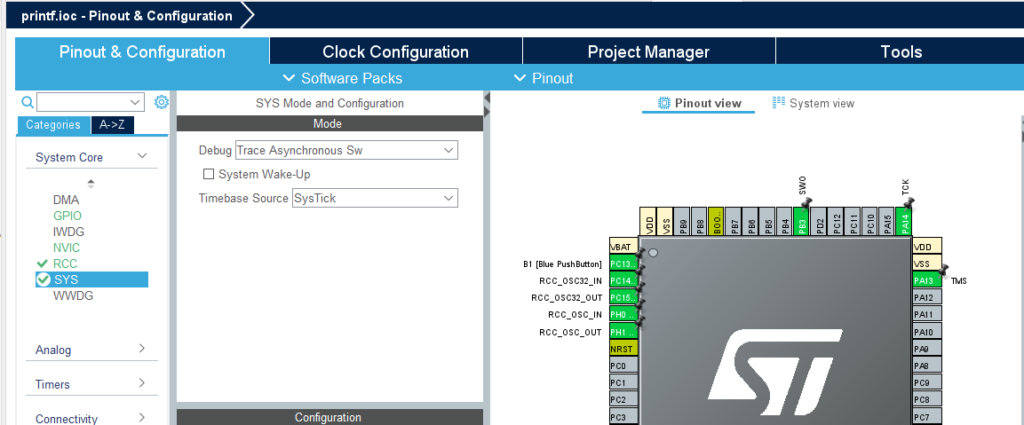
- Set debug mode to Trace Asynchronous SW.
Pin Mapping
- PA13 SWDIO
- PA14 SWCLK
- PB3 SWO

Override _write Functions
Understanding how printf works is crucial. The printf function is implemented within the C library, and at the end of its function chain, it calls another function: the _write() function. In microcontrollers, this function needs to be implemented manually.
The standard implementation is as follows:
__attribute__((weak)) int _write(int file, char *ptr, int len)
{
	int DataIdx;

	for (DataIdx = 0; DataIdx < len; DataIdx++)
	{
		__io_putchar(*ptr++);
	}
	return len;
}
Redirect to ITM
To redirect the output to the ITM, override the _write() function in main.c and replace the call to __io_putchar by ITM_SendChar:
#define PUTCHAR_PROTOTYPE int __io_putchar(int ch)

PUTCHAR_PROTOTYPE
{
    ITM_SendChar(ch);
    return ch;
}
SWV Windows
Debugger Configuration:
To enable the SWV function, in the Debugger Configuration screen, select below settings:
- Interface:
SWD - Serial Wire Viewer:
- Enable:
true - Core Clock: should match the real CPU clock in the setup step, such as 80MHz
- Enable:

SWV Windows:
The next step is to add SWV Windows into the Debug perspective of IDE.
Select Windows → Show View → SWV and select one of available windows type. For displaying ITM Print data, select the SWV ITM Data Console window.
Click on the Config icon in the SWV ITM Data Console tab, enable the ITM 0 and apply. Press on the Red button to start reading the SWV data.


Resume the execution and observe the text appears on the ITM Data console:
Conclusion:
Serial Wire View (SWV) is like having a secret camera inside your microcontroller, providing a live view of its inner workings. By understanding how to use SWV, you become a detective who can quickly identify and fix issues in your STM32 projects. So, grab your detective hat and start exploring the fascinating world inside your microcontroller with SWV!


[…] How to Use printf on STM32 using ITM+SWO line […]
[…] Serial Wire View (SWV) […]