How to Connect the BeagleBone Black using USB to TTL Serial Converter Cable
The BeagleBone Black (BBB) is a versatile development board that allows users to connect to various devices and peripherals. One effective way to communicate with your BBB is through the serial port using a USB-to-TTL Serial cable. This method is particularly useful for debugging, especially if you encounter booting problems or networking issues.

Why Use Serial Communication?
While SSH over USB is the preferred method for most applications due to its simplicity and reliability, serial communication offers several advantages:
- Direct Access During Boot: Monitor the boot process and catch any early-stage issues.
- Versatile Connectivity: Connect to devices other than PCs, like other microcontrollers or sensors.
- Troubleshooting: Access your board when network connections are unavailable.
What You Need
To establish a serial communication between your computer and the BeagleBone Black, you need:
- A BeagleBone Black board.
- A USB-to-TTL Serial cable.
- A computer running Windows, macOS, or Linux.
Connecting the BeagleBone Black via Serial on Windows
If you’re using Windows, follow these steps to connect your BBB via serial using PuTTY:
Step 1: Install PuTTY
- Open your web browser and go to the PuTTY download page.
- Click the
putty.exefile to download it. - Run the
putty.exefile to install PuTTY.

Step 2: Make the Physical Connections
- Connect the USB side of the TTL cable to your computer.
- Connect the wires to the J1 headers on your BeagleBone Black:
- Black wire to Pin 1 (GND)
- Green wire to Pin 4 (RX)
- White wire to Pin 5 (TX)
Step 3: Configure PuTTY
- Open PuTTY.
- In the PuTTY Configuration dialog box, select Serial.
- Identify the serial port name:
- Open Device Manager (Press
Windows+R, typedevmgmt.msc, and press Enter). - Find the serial port listed under Ports (COM & LPT).
- Type the serial port name in PuTTY.
- Set the speed to
115200. - Click Open.
Step 4: Power Up and Connect
- Power on your BeagleBone Black with a Mini USB cable.
- You should see the boot process details in the PuTTY terminal.
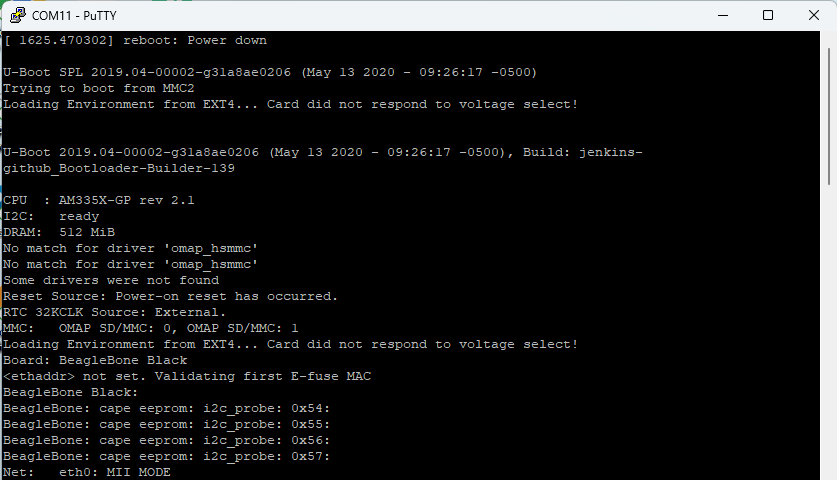
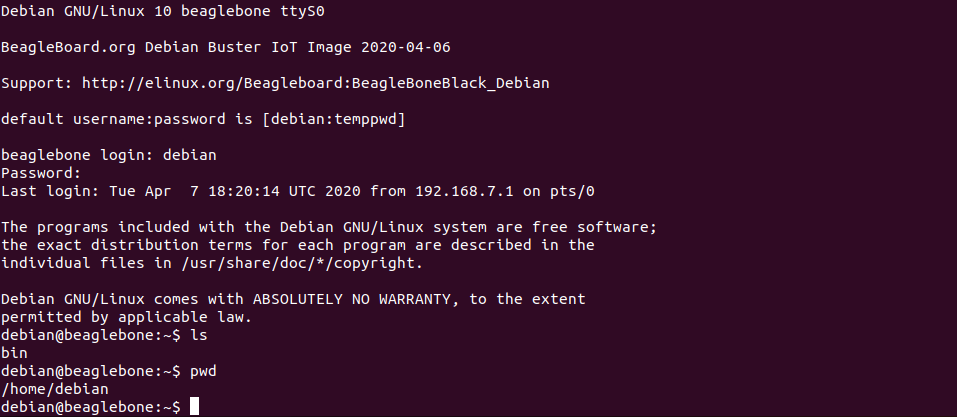
- When prompted to log in, type
debianand press Enter. - Type
temppwdas the default password and press Enter.
Connecting the BeagleBone Black via Serial on macOS and Linux
For macOS and Linux users, the process involves using the terminal:
Step 1: Open the Terminal
- On macOS, navigate to
/Applications/Utilitiesand double-click Terminal. - On Linux, press
Ctrl+Alt+Tto open a new terminal window.
Step 2: Identify the Serial Device

- With your BBB unplugged, type
ls /dev/tty*to list devices. - Connect the USB side of the TTL cable to your computer.
- Connect the wires to the J1 headers on your BeagleBone Black:
- Black wire to Pin 1 (GND)
- Green wire to Pin 4 (RX)
- White wire to Pin 5 (TX)
- Type
ls /dev/tty*again to see the new device (e.g.,/dev/ttyUSB0).

Step 3: Establish Serial Communication
- Install screen using
sudo apt install screen - In the terminal, type
sudo screen /dev/ttyUSB0 115200. - Power on your BeagleBone Black with a Mini USB cable.
- You should see the boot process details in the terminal.
- Enter your computer password if prompted.
- When asked to log in, type
rootand press Enter or Return. - Press Enter or Return when asked for a password (no password by default).
Exiting the screen Session
- To exit the
screensession, pressCtrl+Afollowed byK. Confirm by pressingY. - To Learn More About screen visit here: GeeksForGeeks


risks of steroids
References:
https://graph.org/Quel-est-le-meilleur-coupe-faim-vendu-en-pharmacie-01-18
all hyperbolic steroids are also anabolic.
References:
https://gpsites.stream/story.php?title=la-verita-sul-testosterone-dopo-i-40-anni-come-mantenerlo-con-lo-stile-di-vita
%random_anchor_text%
References:
https://yogaasanas.science/wiki/Trembolona_Acetato_Comprar_al_Mejor_Precio_en_Espaa
anabolic drugs
References:
https://instapages.stream/story.php?title=snap-testo-booster-review-is-it-worth-using
References:
Video poker odds
References:
http://09vodostok.ru/user/nylonfuel1/
References:
San manuel indian casino
References:
https://p.mobile9.com/formatbox1/
References:
888 casino download
References:
http://ezproxy.cityu.edu.hk/login?url=https://candy96.eu.com/fr-be/
References:
Harrah’s casino tunica
References:
https://www.demilked.com/author/pvcgum74/
References:
Hardrock casino
References:
https://coolpot.stream/story.php?title=comment-jouer-a-candy-land-10-etapes-avec-images
References:
Marksville la casino
References:
https://gpsites.stream/story.php?title=a-premier-destination-for-real-money-play
References:
Genting casino southport
References:
https://schoolido.lu/user/georgeyogurt82/
References:
Bicycle club casino
References:
https://stackoverflow.qastan.be/?qa=user/roofblue41
References:
Turning stone casino
References:
https://yogicentral.science/wiki/Registro_Paso_A_Paso_Candychat_PDF_Aplicacin_movil_Chat_en_linea
References:
Keno payouts
References:
https://xn--41-4lcpj.xn--j1amh/user/groupmap73/
References:
Games slot machines
References:
https://cameradb.review/wiki/Check_a_website_for_risk_Check_if_fraudulent_Website_trust_reviews_Check_website_is_fake_or_a_scam
anabolic steroid abuse side effects
References:
https://bom.so/UsvLk2
cutting stack bodybuilding
References:
https://socialisted.org/market/index.php?page=user&action=pub_profile&id=273466
References:
Anavar oxandrolone before and after
References:
https://sportpoisktv.ru/author/lyrichawk8/
References:
Lady anavar before and after
References:
http://king-wifi.win//index.php?title=ironsystem79
References:
Before and after anavar cycle women
References:
https://may22.ru/user/woolfriday9/
References:
Female before and after anavar
References:
https://adsintro.com/index.php?page=user&action=pub_profile&id=749003
best legal bodybuilding supplements
References:
https://urlscan.io/result/019bd5c5-3cdf-76df-b1a9-902efb99c1a3/
muscle builder supplements gnc
References:
https://jespersen-bager-3.technetbloggers.de/dianabol-buying-guide-tips-dosage-where-to-buy
how much does winstrol cost
References:
https://humanlove.stream/wiki/LegalSteroids_com_Top_9_Steroids_Alternatives_Buy_Online_Anabolics_SDI_Labs
References:
Anavar and winstrol stack before and after
References:
https://digitaltibetan.win/wiki/Post:Candy_Casino_Review_2025_Slots_Bonuses_Ratings
References:
Test and anavar cycle before and after reddit
References:
https://firsturl.de/lI03fs2
Neben dem No Deposit Bonus gehört auch ein Einzahlungsbonus zum Willkommensgeschenk für alle neuen Spieler im Verde Online Casino. Bei dem No Deposit Angebot von Verde Casino handelt es sich um 50 Freispiele für den Fantasy Slot „Book of Sirens“ von Spinomenal. Alle neuen Spieler, die erstmals ein Kundenkonto bei Verde Casino einrichten, dürfen sich über einen attraktiven Neukundenbonus freuen. Zu den Highlights des Angebots gehören ein hoher Willkommensbonus für neue Spieler sowie regelmäßige Special Boni für Bestandskunden. Das Online Casino Verde bietet aktuell ein sehr vielfältiges Bonus Programm.
So einfach können Sie Freispiele ohne Einzahlung nutzen und vielleicht sogar echtes Geld gewinnen! Freispiele sind eine risikofreie Möglichkeit, ein Casino auszuprobieren – und mit etwas Glück echtes Geld zu gewinnen! Eine weitere interessante Bonus ohne Einzahlung-Option sind Freispiele, die Sie bei der Anmeldung in vielen seriösen Online-Casinos erhalten. Es ist ganz einfach, Gratis-Spielgeld-Boni bei mehreren Online-Casinos zu erhalten.
References:
https://www.facebook.com/people/Winz-io-casino/61585762127473/
paypal casinos online that accept
References:
http://www.chinajobbox.com/companies/online-casinos-australia-best-aussie-casino-sites-of-2025/
online casinos mit paypal
References:
https://www.bisp2.com/companies/10-best-australian-online-casinos-2025/
us online casinos paypal
References:
https://saek-kerkiras.edu.gr/employer/australian-online-casinos-that-accept-paypal-2025/
us online casinos that accept paypal
References:
https://spin.org.pk/employer/online-casino-mit-paypal-einzahlung-die-top-casinos-im-vergleich/
paypal casino sites
References:
https://skillnaukri.com/employer/10-best-online-casinos-australia-for-real-money-gaming-in-2025/
Therefore, Ozwin is available to play on mobile, PC and tablet browser! You’ll be delighted to find the very best pokies and slots at your disposal. If anything needs attention, live chat and an FAQ are available 24/7, and you can email for manual opt-ins like cashback claims. Following those points keeps your bonus funds intact and maximizes your chance to convert bonus play into withdrawable winnings. Ready to turn a single account into serious play power?
If not, you shouldn’t sign up to play for real money. This includes players from European countries like the UK. The only way to access them is when you join the casino. New RTG slots appear on the casino lobby’s home screen.
You can use our instant play casino via any browser, but Google Chrome guarantees the best performance. At Ozwin Casino in Australia, offer a variety of free spins bonuses to keep the excitement going. This step is a cornerstone for any gambler looking to carve out a successful career and paves the way for playing with real stakes. The only remaining step to activate your account is verification, which involves sending a scanned copy of your document for verification to the provided address.Once you’re a verified member, you’re ready to deposit funds into your virtual account. You can rest assured that all our games are regularly reviewed by both us and independent auditors to make sure that they all work as they should and pay out the correct amounts that are advertised.
References:
https://blackcoin.co/ufo9-casino-your-place-to-play-your-way/
paypal casino android
References:
http://www.3e0bl91azmcnwkspav10e.com/
casino mit paypal
References:
rentologist.com
We’re sorry to hear that you initially experienced difficulties
with your withdrawal. I know my bank account details & they also said
the swift code was wrong, Give me my money!!! I have
been trying to get a refund from KingBilly Casino regarding deposits made after the new Dutch KSA remote gambling law came into effect (October 2021).
The support team is prompt and professional.
The turn over is a little high but we all want to
win big so its acceptable. Nice casino,RTP super,fast with..fast KYC,no bed
Get ready to level up your gaming experience at King Billy Casino!
Enjoy a 25% match up to $450 on your first deposit, plus
a generous 50 free spins no-deposit bonus on top!
As a new player, you’ll be greeted with a thrilling welcome bonus package that’s out
of this world! Join the royal court today and experience the ultimate gaming adventure!
References:
https://blackcoin.co/best-skrill-casinos-for-uk-players/
Say I do in one of our exquisite wedding venues complete with world-renowned chefs, luxurious hotel suites and
an indulgent day spa. No one knows food like Melbourne and there’s
no better place to experience this than at Crown Hotels. Join our inner circle and enjoy the
value of being in the know. Crown Direct provides insider access to the best rates
and deals across Crown Hotels.
Crown Melbourne must keep the casino free from criminal influence or
exploitation. Our Position Statement on Harm Minimisation makes it clear to Crown and other gambling operators that they have
a duty to act wherever harm is identified or suspected.
Crown has been required to prevent the harmful impacts of gambling by acting
decisively and promptly whenever its personnel sees or suspects harm is
occurring. Responsible for investigating suspected breaches and enabling enforcement action when the casino
fails to meet its obligations. Responsible
for assessing and licensing casino staff who must receive regulatory approval, as well as considering and
approving a vast array of equipment, games, rules and processes
critical to casino operations. It ensures that the casino complies with all its regulatory obligations and operates safely,
fairly, and free from criminal influence.
References:
https://blackcoin.co/a-guide-to-casino-comp-points-vip-programs/
While it does provide a thrill, the risk is higher than other gaming choices.
In our experience, the number of available themes and play styles is endless.
They feature colourful themes, engaging graphics, and exciting bonus features.
Live dealer games will give you the opportunity to play
against real live dealers where the results are determined
by a croupier as opposed to a Random Number Generator. We put each online casino through a strict vetting process,
covering a broad spectrum of characteristics before we decide whether the online casino is best suited
for Australian players. Our AU online gambling site features the top 10 trusted casino reviews as well as all the latest promotions
for new and returning players. The time it takes
to deposit funds at a real money casino depends on the payment method you use.
References:
https://blackcoin.co/methspin-casino-real-money-online-pokies-australia/
Zur Ausübung dieser Rechte können sich Benutzer über die oben genannten Kontaktdaten an uns wenden. Heute
bietet PSK Casino vielfältige Spiele wie Slots, Tischspiele und Sportwetten in Zusammenarbeit mit bekannten Anbietern wie Greentube und Wazdan. Der Support ist auch per E-Mail
unter [email protected] erreichbar, wobei Anfragen in der Regel innerhalb weniger Stunden beantwortet werden.
Die App ist aufgrund der Google-Richtlinien zu Wett-Apps nicht im Google Play Store
verfügbar. Nuvei bietet ebenfalls vollständige Ein- und Auszahlungsfunktionen.
PSK Casino ermöglicht seinen Benutzern in Deutschland verschiedene Optionen für Ein- und Auszahlungen mit hohen Sicherheits- und Komfortstandards.
Im Folgenden finden Sie einen Überblick über
die aktuell verfügbaren Boni, Mindestvoraussetzungen für die Aktivierung sowie die Umsatzbedingungen.
Sie können davon ausgehen, dass Sie in diesem
Casino gut und anständig behandelt und insgesamt eine angenehme
Spielerfahrung erleben werden, aber nur dann, wenn Sie sich dafür entscheiden dort auch
wirklich zu spielen. Es bietet eine sichere Zahlungssysteme, einschließlich PayPal, Skrill und Credit Cards.
Vergleichen Sie die besten Casinos und spielen Sie verantwortungsbewusst.
Die Live-Dealer-casinos sind großartig, PSK von lässt dich wie in einem echten Casino fühlen.
References:
https://online-spielhallen.de/ihre-ultimative-anleitung-zum-kingmaker-casino-bonus-code/
Schließen Sie sich der Gewinnerseite an und erleben Sie jederzeit sichere
Einzahlungen, Fairplay und spannende Action. Registrieren Sie sich noch heute bei Admiral Casino
und Sie erhalten Zugriff auf Hunderte von Optionen führender Entwickler.
Legen Sie Ihre Präferenzen fest, schützen Sie Ihr Konto und erhalten Sie exklusive Angebote, die nur
für Neuanmeldungen sofort verfügbar sind.
Eine weitere gute Möglichkeit, aktive Werbeaktionen zu finden, besteht darin, in Ihrem Benutzerprofil nach
Bannern Ausschau zu halten. Spieler, die loyal sind, und Leute, die neue Funktionen nutzen oder neue Events besuchen, erhalten oft Codes.
Im Moment der Anmeldung erhalten Sie dadurch direkten Zugriff auf Sonderangebote.
Um einen Promo-Code für unsere Gaming-Plattform zu erhalten, empfehlen wir Ihnen, ein Konto zu erstellen und E-Mail-Benachrichtigungen einzurichten. Einige der Preise sind Freispiele, Bonusgeld und Plätze
in der Bestenliste, die Ihnen zusätzliche Vorteile bieten.
References:
https://online-spielhallen.de/pelican-casino-erfahrungen-ein-umfassender-uberblick/
hgh and testosterone stack cycle
References:
Wehrle
how to measure iu of hgh
References:
Hgh Before And After Photos (https://Www.Instapaper.Com/P/16741089)
how much hgh should i take a day
References:
wehrle
how much hgh to take
References:
Hgh Dosage For Beginners, Thewilcoxreport.Com,
Hi there, after reading this amazing piece of writing i am as well
cheerful to share my familiarity here with colleagues. https://www.tswanahome.com/author/dragonslots59/
female bodybuilder steroids
References:
i-medconsults.com
After checking out a few of the blog posts on your blog, I
truly appreciate your way of blogging. I added it to my bookmark webpage list and will be checking back
in the near future. Please check out my web site as well and tell me what you think. https://Azurslotcasino.Wordpress.com
Way Of Life measures like proper diet and exercise maximize
hormonal response. If you might be experiencing the results of hormonal decline,
sermorelin and testosterone therapy could additionally be best for you.
Our skilled medical staff at Physician’s Rejuvenation Facilities
can consider your hormone levels and determine if these therapies are appropriate.
It works by stimulating the pituitary gland to extend the production and launch of development hormone.
In Distinction To pure GHRH, CJC 1295 has a longer half-life because of its capability to
bind to plasma proteins, allowing for sustained results over an prolonged interval.
This unique characteristic makes CJC 1295 an appealing choice for those in search
of to optimize their progress hormone levels. The mechanism of action of
CJC 1295 involves binding to specific receptors on the pituitary
gland, triggering a cascade of events that ultimately leads to increased growth hormone secretion.
Nevertheless, an elevated secretion of testosterone was noticed when maximum effective
doses of rGH (50 ng) and oLH (100 ng) were co-administered.
Minimum efficient (25 ng) or most effective (50 ng)
doses of T3 inhibited GH-mediated secretion of testosterone in vitro.
Not solely that, however ipamorelin additionally supports mind well being and age-related decline brought on by medical
conditions, corresponding to Parkinson’s illness.
Aside from that, a study in the Journal of Medical Investigation confirmed that the
peptide ipamorelin also can improve immune system health and performance.
By stimulating the pituitary gland, it promotes mobile regeneration,
muscle improvement, and collagen synthesis. Losing
weight will largely be determined by training and
food regimen, however, Tesamorelin combined with skilled medical advice
can help you lose lots of fat. JustifiabilityAny claims regarding the benefits/performance of a particular remedy,
business services or products shall be supported by applicable, balanced evidence within the method outlined above.
IV Vitamin Remedy (hereafter known as the “Clinic”) helps the HONcode initiative to improve the standard of medical and health info out there on the
world broad web. It’s an FDA-approved GHRH (Growth Hormone-Releasing Hormone) analog developed primarily to scale back visceral adipose tissue in HIV patients affected by lipodystrophy.
Whereas that’s its official use, its benefits go far beyond a slim clinical software.
In rare circumstances, Sermorelin could trigger more severe unwanted effects similar
to allergic reactions or swelling within the arms and toes.
It’s important to report any uncommon signs to your healthcare provider
and observe their steering on dosing and administration. Sermorelin is generally
considered a safe and efficient choice for progress hormone stimulation when used under medical supervision. Another advantage of CJC-1295 is its capability to work
synergistically with taking ipamorelin and sermorelin.
When combined, these peptides present a powerful increase to progress hormone manufacturing, making them best for individuals seeking to optimize physique composition and athletic
performance. CJC-1295 is often utilized by bodybuilders, athletes,
and fitness lovers who need to enhance their bodily efficiency,
cut back recovery time, and maintain a lean, muscular physique.
Semaglutide’s influence on metabolic health can be further optimized by strategic
peptide additions corresponding to sermorelin and by leveraging completely different administration routes to reinforce bioavailability.
You ought to expect the benefits of sermorelin consumption after persevering with the use for as long as 3-6
months. Nonetheless, for bodybuilding, the Sermorelin dosage
is often began above 500 mcg. Particularly, it helps within the faster recovery of sufferers who have arthritis or other
manageable chronic conditions. This happens because of
the proliferative action of growth cells surrounding the injured areas.
One significant advantage of incorporating this stack is the promotion of
lean muscle mass while reducing body fats proportion, leading
to a more outlined physique. Exploring the advantages of using the tesamorelin-ipamorelin stack provides valuable insights
into its constructive impression on physique composition,
hormone secretion, and overall performance enhancement.
Are you seeking to enhance your progress hormone manufacturing and cut
back physique fat?
Yet, Ipamorelin is more extensively known for benefitting from the
“growth” facet. Whereas Sermorelin will increase HGH
naturally (more on that below) by binding directly to hormone receptorsIpamorelin binds to ghrelin receptors.
When you break down some of the variations between these two anti-aging peptides, they are
very delicate.
WIN-MAX is designed by CrazyBulk as a alternative, combining high quality components to help you lose
fats and probably even gain muscle as nicely. TREN-MAX is meant to be a authorized alternative to perhaps the preferred steroid on the planet
– Trenbolone. It needs to be mentioned that this won’t come close to the outcomes
of Trenbolone, however, it won’t have any of the unwanted effects.
So as a substitute of focussing on getting nice trenbolone
results in 2 weeks, it’s necessary to make use of it with caution. Check
out this shocking tren before and after transformation to see the drastic
modifications. Based on my research and experience, one of the best time to take Anavar is within the morning, on an empty abdomen. This is
as a end result of Anavar has a half-life of solely
4 to six hours, so taking it within the morning will be
sure that it stays lively in your system all through the day.
However, there are exceptions to every rule, as some
girls abuse Anavar, taking high doses for excessive periods of
time, which might actually result in masculinization. We don’t endorse
the utilization of anabolic steroids; nonetheless, we perceive that many
girls and women are utilizing these substances and need appropriate steering.
While indications level in direction of the Oxandrolone tablets
being mild on the body, it’s important to remember everybody is exclusive.
The phenomenon called virilization poses the biggest
fear, involving indicators corresponding to deepening of the voice, further facial or body
hair, and disruptors to menstrual cycles. As Quickly As these traits are established, reversing them could
be difficult, even after discontinuing Anavar. Cardiovascular well being can also be at
stake; poor cholesterol readings over time might open the door to heart issues.
Additionally, sturdy emotional reactions—like heightened anger or depressive episodes—may floor,
complicating day by day life and relationships. Males taking Anavar may encounter unwanted effects that specifically disrupt male hormonal stability.
Most notably, the physique can cut back or stop its
natural testosterone production because it detects the synthetic hormone.
This drop in testosterone may cause lowered intercourse drive, fatigue, and even testicular atrophy,
a condition by which the testicles shrink because of lowered activity.
Anavar’s capability to increase energy is believed to be related to the uptake
of ATP and fluid contained in the muscle cells. Bulking steroids
are usually essentially the most powerful steroids for growing strength, with slicing
steroids being inferior. Different compounds that construct muscle usually leave users with
easy and puffy-looking muscular tissues. Anavar is able to
keep away from this by shifting water from exterior the
muscle cell, to the within.
Purchasing anabolic steroids from unregulated sources poses
important health dangers and authorized penalties.
Anavar and Winstrol possess many similarities,
with each lowering fats mass and water retention while growing lean muscle mass.
Whereas Anavar presents numerous potential benefits for female bodybuilders and athletes, it’s crucial
to acknowledge potential unwanted side effects.
Despite being thought-about a gentle steroid in comparability with others,
caution is warranted. Customers ought to pay consideration to attainable virilization effects and often monitor well being to hold up a balanced and responsible
approach to its utilization. In abstract, a 4-week Anavar cycle could show beneficial for female athletes seeking to amplify
their performance inside a comparatively transient period.
Although not as defined, the changes acquired during this timeframe
can vary from improved strength and endurance to
a slight increase in lean muscle improvement.
This permits them to push harder throughout exercises and see sooner progress.
The personal journeys shared within the earlier than and after photos show
the potential of Anavar to unlock the complete
power of the female physique. Sungate Stanozolol is
a properly known model in the world of performance-enhancing medicine.
Wrap that cycle, enable your physique a considerable relaxation interval, and reflect in your progress.
Over 6-8 weeks for males and weeks for women, you would likely observe
a major difference compared to earlier than you started the cycle.
A well-balanced, protein-rich food regimen and a rigorous
workout plan can considerably enlarge cycle results.
Moreover, individual genetic make-up performs a vital position in how one responds to
this substance. Sure, Anavar can have an effect on feminine fertility as it impacts the body’s hormones and menstrual cycle.
If we’re discussing steroids before and after outcomes, particularly
for fats loss then you can’t go incorrect with this one!
Clenbuterol won’t do much for muscle growth, but it’ll shred fats like no other compound.
Clen’s not a steroid, however it’s been added to this listing because it’s usually
used in steroid stacks and alongside other AAS.
As with any steroid combination, it’s important to know how the elements work together and
be conversant in the potential pros and cons.
Whereas the mix of Testosterone with Anavar can enhance a user’s fitness goals, the extra
dangers ought to always be considered. The
first 20mg of Anavar ought to be taken daily to get a
great sense of how well the treatment is tolerating the body.
You can proceed the cycle for the full eight weeks or for a most of 10 weeks.
Boosting endurance and stamina are essential targets for athletes and fitness enthusiasts who need to maximize
their efficiency. Anavar solo cycles provide an effective method
to achieve these targets, offering people with a secure and reliable answer for enhancing their physical abilities.
This article will delve into the advantages of Anavar solo cycles and showcase inspiring earlier than and after transformations, highlighting the
incredible results that could be achieved.
When embarking on an Anavar solo cycle, it is important to have a well-structured training program in place.
By combining common resistance training with using Anavar, users can anticipate
to expertise notable improvements of their strength
ranges. It is recommended to progressively enhance the dosage
of Anavar over time, allowing the body to adapt and maximize the potential advantages.
This aids in normalizing hormone ranges for optimum
physiological and psychological health, in addition to
retaining outcomes from a cycle. Over half a century later, numerous ladies have used Anavar anecdotally and in research.
Now it’s widely thought of that doses within the vary of 5–10 mg produce noticeable
results while inhibiting virilization. Nonetheless,
as a result of Anabolic Steroids Management Act of 1990, Anavar became illegal to purchase and not utilizing a medical cause.
References:
https://devkona.net/
The mixed use of KPV and nanoparticles has shown the next analysis
curiosity than KPV alone in research associated
to ulcerative colitis. Research indicates that KPV is generally thought-about
secure and well-tolerated in research settings, however like several peptide, it can have potential
unwanted facet effects. The commonest unwanted side effects
are associated to the applying site, together with redness, swelling, and discomfort.
Some studies counsel gastrointestinal results corresponding to nausea
and diarrhea may happen. Nevertheless, these unwanted effects are
usually gentle and short-term, resolving on their own without the necessity for intervention. It’s essential for researchers to
monitor these results to make sure the integrity of their research.
GHK-Cu is primarily an anti-aging peptide that is able to improve collagen production, which isn’t only
beneficial for the pores and skin but additionally for quicker wound therapeutic and other bodily functions.
These properties are particularly useful in the context of wound therapeutic, as stopping infections can considerably improve the
healing course of and cut back the risk of issues. Studies continue
to explore KPV’s antimicrobial effects, particularly its potential in combating antibiotic-resistant bacterial infections.
Beyond its anti-inflammatory effects, analysis suggests that KPV peptide
also displays antioxidant and anti-aging properties,
which additional improve its analysis potential.
Studies counsel that kpv peptide colitis study can speed up wound therapeutic and reduce an infection, highlighting its
multifaceted benefits.
Assume of it like your physique’s built-in irritation off change
for specific trouble spots. KPV peptide is
that tiny tripeptide (Lys-Pro-Val) everyone’s talking
about in bodybuilding circles today. It Is not some
miracle drug, but it does one thing fairly cool – calms inflammation without wrecking your immune system.
I’ve seen guys utilizing it for intestine points and skin issues with precise results.
KPV is unlikely to mediate its results by way of melanocortin receptors however is
extra prone to act through inhibition of IL-1β functions”. In a examine targeted on UC, mice handled with HA-KPV-NPs confirmed vital improvements in mucosal healing and a reduction in pro-inflammatory cytokine ranges. This research utilized electrical impedance sensing (ECIS) expertise to measure the therapeutic of wounded epithelial layers, demonstrating the effectiveness of HA-KPV-NPs in enhancing restoration. Many lifters add KPV to their routine because it helps pace up healing and lower muscle soreness after robust exercises. How protected does that really feel when you’re pushing to construct muscle or recuperate faster? Folks using KPV for muscle aches or gut points report feeling better and stronger after exercises, with no indicators of skin rash, upset stomach, or bizarre soreness.
We usually include information about a peptide’s timeline of benefits, however to do the same with KPV would require an unreasonable amount of unhelpful conjecture. Of notice, the research on KPV’s effects has been accomplished primarily in animal models and human cell cultures, not in human subjects immediately. Due To This Fact, the help for its therapeutic makes use of is limited, albeit largely optimistic. While many therapeutic peptides are taken by needle, KPV stands apart in that it may additionally be administered as an oral capsule or chewable tablet. Our series on therapeutic peptides has taken us by way of articles on tons of of medical research and other scientific sources on the topic, spread over greater than 1,000 cumulative hours. KPV alone concerned several dozen such sources and upwards of 30 hours. Alongside the method in which, we leaned on our relationships with people who know peptides on the bottom level — each prescribers and sufferers.
For example, one peptide might improve GH release, whereas the opposite boosts IGF-1 ranges for muscle development. TB-500 improves recovery by enhancing tissue restore and decreasing inflammation, making it a valuable peptide for harm prevention and restoration. CJC-1295 is a development hormone-releasing hormone (GHRH) analog that increases GH and IGF-1 levels, supporting muscle growth and restoration.
Analysis protocols on this space typically combine the peptide with other therapeutic compounds to achieve synergistic cardiovascular protection. Research protocols demonstrate that effective concentrations depend heavily on the specific inflammatory model and goal tissue. Laboratory-grade preparations require cautious consideration of supply methods to ensure optimal bioavailability and goal engagement. Complete laboratory investigations have established detailed dosing protocols for various analysis applications of these peptides.
For extra information about the relationship between Hone and the medical practices, click here. Research-backed tools, ways, and strategies to maximize your well being, delivered to your inbox every Monday. You can even ask the pharmacy should you can ship the peptide to a lab to confirm the contents. Selank has a excessive danger of immune reactions and impurities in the course of the compounding process, based on the agency’s press release.
If a person is consuming upkeep calories or in a surplus, Winstrol’s capability to add measurement is more
notable. Winstrol is a potent muscle-builder, although not as highly effective as bulking steroids, similar to Anadrol or Dbol.
Nonetheless, this isn’t to say it is only utilized by girls, with a number of male powerlifters and
bodybuilders also utilizing Anavar to good impact.
This means that while the quantity on the size may not change dramatically, your physique composition can shift considerably.
You’ll likely notice a discount in body fat, especially around
stubborn areas just like the waist and thighs, leading to a
more sculpted look. Anavar works by growing protein synthesis within the muscular tissues,
which allows girls to experience muscle growth with out excessive
bulk. It’s good for people who want to obtain a lean, toned physique with out the unwanted “bloat” or water retention that another steroids may cause.
Additionally, Anavar helps enhance endurance and recovery, making it easier to push through robust exercises
and recover quicker afterward.
Your energy in your compound lifts like squats, deadlifts, and
the bench press should increase by about 10%.
Be aware that during your first cycle you will also begin to experience a
lowered pure manufacturing of testosterone and human progress hormone.
It will trigger some will increase in muscle measurement, but that is
much less dramatic in comparability with bulking steroids.
However, it’s more adept at burning fat shops and leaning
out customers.
Depending on results required and whether you are male or female—the Anavar cycle dosage, and the other steroids it could be stacked with, varies.
Nevertheless, for guys involved about opposed well being results, or those who are extra delicate to steroids, this implies it can operate as
a light muscle builder. Additionally, this alteration means Anavar has low androgenic properties, lowering the possibility of
unwanted effects in guys and making it top-of-the-line steroids for girls.
Make each part of your Anavar cycle an opportunity to improve your performance, your physique, and your well-being.
Nevertheless, safer and more effective alternatives corresponding
to Anvarol can be bought at reliable shops such as the official CrazyBulk website.
Sure, prolonged administration or additional Anavar is even identified to induce irreversible masculinization like deepened voice, body and facial
hair growth, and sexual health alterations. The half-life of Anavar
is 9-10 hours, and thus, dosing twice daily might be essential to realize stable blood ranges for optimal effects.
Circulating testosterone because the hormonal foundation of sex differences in athletic efficiency.
Effects of oxandrolone on plasma lipoproteins and the intravenous fats tolerance in man. Furthermore, if an individual has
experienced gynecomastia, this is a sign that the
substance is Dianabol (42). These are a few of the points bodybuilders who visit our clinic
face when acquiring UGL anavar before and after 1 month women.
It’s also necessary to note that virilization doesn’t occur in a single
day, however instead is a gradual effect. In research,
outcomes present that Anavar does have the chance to cause masculinization in girls and
women, nevertheless, the dose would must be excessive and taken for an excessive
time frame. Thus, Anavar has the ATP advantages of more highly effective creatine, but without the bloating.
The bloat as an alternative goes immediately inside the muscle tissue, instead of
spilling outdoors. This creates a giant and tight look quite than a big,
bloated mess look.
Avoid Stacking Harsh CompoundsWomen should keep away from stacking Anavar with
highly androgenic steroids like Winstrol or Masteron, which
greatly improve the risk of masculinization. These results end result from Anavar’s interplay with androgen receptors, particularly when blood concentrations turn out to be too elevated.
Whereas Anavar is less androgenic than most other steroids, it still exerts androgenic activity — especially at doses above 15
mg/day. Elevated Muscle Hardness and DefinitionAnavar produces
a dry, dense look to the muscles. Unlike other compounds, it
doesn’t cause water retention, making it perfect for girls aiming to look
toned and sculpted.
Accountable use and training are crucial for minimizing risks and achieving success.
Steroids like Anavar and Winstrol are especially well-liked
amongst ladies since they promote lean muscle without causing important masculinization. When used responsibly and paired with proper
training and nutrition, steroids are effective for women looking to achieve their health
and physique composition targets. Anavar is a very fashionable drug amongst
gym-goers, as a outcome of it’s one of the safest anabolic steroids
and comes with minimal side effects. The drug far surpasses traditional testosterone within the body, which
makes it easier to build and hold onto muscle whilst getting lean. You
can expertise adjustments in your voice, a rise in body or
facial hair, enlarged clitoris and loss of menstrual cycle, however these usually
are not skilled by all and even most users. They’re easily reversible should you cease utilization instantly upon the onset of
undesirable signs.
It is essential to notice that you should start slowly with any compound to see the
way you react to it earlier than rising the
dosage. The extra medicine you use, the extra injury you’re inflicting, the dearer it is, and the
extra health management you have to follow. The much less “exposed” you are to the compound or the dose,
the extra severe the consequences shall be. One Other issue
to contemplate is what you’re on already – if you’re already on 1000mg of
other compounds, then 20mg of Anavar is not likely to do anything.
Even though it’s sometimes used extra typically by
females, plenty of males have had some pretty amazing outcomes while using this compound.
The thing is, in phrases of Anavar’s results, there are plenty of
completely different opinions out there.
He is a former bodybuilder and creator of a quantity of health web sites.
To keep away from a quantity of health risks, feminine users ought to monitor their levels of cholesterol, liver
operate, and total well-being. It can additionally be advisable to follow a balanced food plan and preserve
a daily train routine to optimize results and minimize dangers.
Anavar is probably considered one of the “best steroids” for women’s weight loss, if you’re decided to burn fat, construct muscle,
and hold your female magnificence.
best test stack
References:
a-taxi.com.ua
crazy mass supplement reviews
References:
rentry.co
winstrol steroids before and after
References:
http://www.google.st
anabolic steroids are appropriately prescribed to
References:
https://isowindows.net
anabolic medical definition
References:
https://hedgedoc.digillab.uni-augsburg.de/uiAqzD6CRC6BfYo7W0Ohqw/
legal steroids tren
References:
iotpractitioner.com
legal steroids australia sale
References:
can you drink alcohol while taking steroids (mahalkita.ph)
muscle enhancers gnc
References:
images.google.be
anabolic steroid trenbolone
References:
anabolic steroids Usage (https://Gitlab.ui.ac.id/galekotai81227)
prolab pharmaceuticals steroids
References:
Valley.Md
how many weeks can u take ipamorelin
References:
N Acety ipamorelin amidate
ipamorelin 2mg axiom peptides for sale
References:
ipamorelin hormonal inquiry
fragment 176-191 & mod grf 1-29 & ipamorelin for sale
References:
How long does it take for cjc ipamorelin to work
what is the difference between tesamorelin and ipamorelin
References:
bpc-157 and cjc-1295/ipamorelin (heres.link)
ipamorelin / cjc-1295
References:
cjc 1295 ipamorelin before And after male; images.google.com.hk,
magnus ipamorelin us domestic
References:
valley.md
ipamorelin injection side effects
References:
ipamorelin vs mk-677 reddit; Vincent,
cjc 1295 and ipamorelin reddit
References:
how long can you take cjc 1395 and ipamorelin
cjc 1295 and ipamorelin price
References:
peptide dosages weight Loss selank And ipamorelin (Martdaarad.com)
ipamorelin injectable
References:
Topical Application Of Ipamorelin
Hello, its fastidious post on the topic of media print, we all understand
media is a enormous source oof facts. https://writeablog.net/ghxc0el0lb
Helpful info. Fortunate me I discovered your wweb site accidentally, and I’m
surprised why this coincidence did not took place inn advance!
I bookmarked it. https://Justpaste.it/azurslot
You shkuld be a part of a contest for one of the most useful blogs on the net.
I am going to recommend this web site! https://Nq8Fr.Mssg.me/
My brother recommended I mmay like this blog. He was once entirely right.
This submit actuallpy made my day. You can not consider simply how much time I had spent for this information! Thanks! https://glassi-india.mystrikingly.com/
steroidforyou review
References:
valley.md
bodybuilding hgh dose
References:
dosage of hgh for bodybuilding (logisticconsultant.net)
dianabol beginner cycle
References:
post cycle therapy For dianabol – https://firsturl.de/W48Z8Be –
does taking creatine break a fast
References:
Can i take creatine when fasting
hgh dosage cycle
References:
wehrle
hgh 4iu per day results bodybuilding
References:
hgh stallone (https://ebra.ewaucu.Us/)
hgh fat loss dosage
References:
hgh betekenis (https://hedgedoc.k8s.eonerc.rwth-aachen.de/J8Pcwhb8S3utdjHRp0Tvxw/)
dianabol only cycle for beginners
References:
valley.md
dianabol only cycle
References:
dianabol 6 week cycle (http://Www.annunciogratis.Net/)
anavar dianabol cycle
References:
dianabol only cycle (coolpot.Stream)
alternative to steroids for bodybuilding
References:
https://azx.az/bobbyroland51
2ahukewipubipvmvnahuy7p4khwr8cqaq4lyoanoecaeqfw|the best steroids for muscle growth
References:
joanrey.com
blackjack driveway sealer
References:
play online roulette
Ein Casino iim Internet ist eine plattform, auff der glücksspielbegeisterte verschiedene glücksspielmöglichkeiten wie tischspiele
und roulette genießen können. Egal, ob Sie ein Anfänger,
Online-Casinos bieten unzählige möglichkeiten für jeden geschmack.
Viele plattformen bieten free spins, um spieler zu
motivieren. Zusätzlich können loyalitätssysteme den Spieler regelmäßige belohnungen ermöglichen.
Transaktionen in online-casinos sind sicher, mit optionen wie banküberweisungen, die schnelle einzahlungen ermöglichen. Sicherheit und fairness sind in guten casinos garantiert.
Spielen im online-casino macht spaß für spieler, die auf der suche nach
großen gewinnen sind. https://de.trustpilot.com/review/cazimbo.onlinecasino24.biz
Ein Online-Casino ist eine webseite, auf der glücksspielbegeisterte
verschiedene casino-spiele wie spielautomaten und roulette genießen können. Ob Sie ein erfahrene spieler sind, Online-Casinos bieten vielfältige optionen für jedes spielniveau.
Die meisten online-casinos bieten attraktive bonusangebote, um neukunden zu belohnen. Zusätzlich können wiederkehrende boni den Spielern weitere vorteile bieten.
Transaktionen in online-casinos sind sicher, mit optionen wie kreditkarten, die
sichere transaktionen ermöglichen. Sicherheit und fairness sind
in guten casinos garantiert.
Diee welt derr online-casinos ist aufregend für spieler, die bequem zu
hauae spielen möchten. https://de.trustpilot.com/review/betiton.bestescasino.biz
Ein Casino im Internet ist eine webseite, auf der spieler verschiedene spiele wie tischspiele und karten genießen können.
Egal, ob Sie ein Anfänger, Online-Casinos bietten eine breite auswqhl
für alle arten von spielern.
Die meisten online-casinos biieten free spins,
um nue spieler zu gewinnen. Zusätzlich können treueprogramme den Spielern weitere vorteile bieten.
Die zahlungssysteme in online-casinos sind sicher, mit optionen wie e-wallets,
ddie sichere transaktionen ermöglichen. Vertrauenswürdige
anbieter sorgen für diee sicherheit der spieler.
Spielen im online-casino macht spaß für spieler, die
aauf der suche nach großen gewinnen sind. https://de.trustpilot.com/review/stnplayonlinecasino.top
Ein Casino im Internet iist eine anwendung, auf der spieler verschiedene glücksspielmöglichkeiten wie tischspiele und pokersiele genießen können. Ob Sie gerne ab
und zu spielen, Online-Casinos bieten vielfältige
optionen für jeden geschmack.
Jedes gute casino bietet willkommensboni, umm
neue spieler zu gewinnen. Zusätzlich können loyalitätssysteme den Spielern zusätzliche anreize schaffen.
Bezahlmethoden sind in online-casinos geschützt, mit optionen wie kreditkarten, die einfache abhebungen ermöglichen. Gute casinos
bieten faire spiele und sichere zahlungen.
Die welt der online-casinos ist aufregend für spieler, die viel spaß beim glücksspiel haben. https://de.trustpilot.com/review/jack-topcasino.top
70918248
References:
illegal steroid list (http://guardian.ge/)
An elective scoring method for cards taken in play is to depend every Aceand ten 10
points, and count every king and queen 5 points. A particular card in your hand could belong to multiple meld of various meld sorts, nevertheless it can not belong to a couple of meld within a meld sort.
For example, when you have Kings round and also a Queen of Golf Equipment,
the King of Clubs can be used in both the Kings round and a Marriage meld.
You May have to determine Runs and Royal Marriages by yourself.
Studying the totally different meld varieties and how to depend them enhances your capacity to strategize successfully.
Focus on maximizing your points by way of cautious planning of
melds throughout bids and performs.
Dive into the world of Double Deck Pinochle with our complete technique guide, tailored for beginners and seasoned gamers alike.
You’ll uncover the nuances of meld bidding, ace on ace leadback strategies,
and rather more. Whether Or Not you are new to the game or
looking to refine your method, this page
presents insights from a player’s perspective, making methods accessible and actionable.
Gamers must at all times comply with suit, and when you can’t comply with you must play a
trump if possible. The object of Auction pinochle is
to form melds and rating points. A particular deck is needed, referred
to as a Pinochle deck, composed of 48 playing cards.
Every player will depend the number of kings and queens won, and are awarded 5
points for every. Four play in two partnerships,
with companions sitting reverse one another. All the playing cards
are dealt out in four rounds of three cards. Every side’s purpose is to attain a hundred or more factors over as many
deals as necessary. Factors are scored for melds and tips as in cutthroat.
If your cards maintain many trump suits or highly effective mixtures, display your melds to secure points and information trick-taking
efficiently.
At All Times “Preset” in Play games; “none (Mikel)” in Apply video games.
“Classic” uses bids and point values that are multiples of
10. It’s attention-grabbing to note that certainly one of Bezique’s biggest proponents was Winston Churchill.
Pinochle definitely falls in a more complicated class
than a recreation like, say, Old Maid, so it
is something you’ll doubtless need to play with an older crowd.
You might discover that the eagerness you could have for Pinochle
is greater than the fervour Michelangelo had for art or Michael
Jordan had for basketball.
If you are enjoying four-player Partnership Pinochle, don’t compete with your partner.
If your companion has already played a trump card, and is guaranteed to win the trick, don’t waste your trump
card beating your companion. The trick-taking phase of the game continues until the entire cards in each player’s hand have been exhausted.
At this level, the point worth of all cards within the
last trick might be combined, and added to the Team or Player’s whole rating.
Pinochle is traditionally a two-player card game, nonetheless,
within the modern-day, partnership Pinochle, played with 4 gamers, is taken into account the standard.
Pinochle is often a four-player recreation performed in two
teams of two gamers every. Nonetheless, a two handed variant is
also popular, pitting a single opponent against one other.
There are many various variations of Pinochle and many gamers
have their very own unique rules and preferences for the means to play.
In this introduction, we’ll start with masking the basics and most universal ideas.
We’ll describe a few of the most common kinds of
playing and primary methods. In subsequent articles, we’ll go into
more detailed descriptions of specific variations and elaborate of on the method to make use of efficient methods for every.
Establish a clear understanding along with your partner before the
game. Talk About which bidding system you’ll use and what specific bids mean. Remember,
a well-coordinated partnership can triumph over even the most seasoned particular person gamers.
Prior to Meld Play – The profitable bidder shall write down the trump suit.
The other player has the choice of guessing the trump go nicely with.
It the other player is correct, he is awarded 5 factors; if incorrect, the winning bidder is awarded
5 factors. Bidding too extremely, nonetheless, can be
a giant detriment and may demolish your score.
Melds, particular card combinations, are displayed to all gamers after the
bidding part and help form your technique for the round.
Most variations of Pinochle finish when a certain predetermined rating is reached similar to
a hundred and fifty factors. The first participant or pair of companions who earn this rating wins.
Pinochle is a classic card sport that has been played for hundreds of years in Europe and America.
In this article, we’ll explain the way to play double pinochle, which is performed with
four gamers in two teams. We suggest reading over the complete instructions earlier than taking half in your first round of Pinochle.
The supplier shuffles the deck, then offers the cards clockwise until
all of the cards are distributed evenly between all gamers.
Specifies an optionally available time restrict for a player to play a card.
“7s,” “15s,”, “30s” & “60s” sets a limit to play a card of seven, 15, 30
or 60 seconds, respectively. “Face Down” permits up to 10 further players to watch
the game with all players’ arms face down. “Yes” shows all
players’ hands face up through the sport. “Yes” to allow
gamers to see bid and card play suggestions, depending
on their private setting.
70918248
References:
dianabol steroids price
À des dosages supérieurs à 750 mg par semaine,
la prise de poids est susceptible d’être plus due à
la rétention d’eau qu’à la formation de nouveau tissu musculaire.
Un tel “surdosage” est inefficace et potentiellement nocif, surtout compte tenu du
coût généralement élevé de la testostérone énanthate,
et n’est généralement pas justifié en dehors des entraînements intenses de bodybuilding.
Les athlètes reçoivent une injection de Testosterone
Enanthate 10 ml par 250 mg une fois par semaine par voie intramusculaire.
Anabolisant est combiné avec des inhibiteurs
de l’aromatase, des anti-œstrogènes, des hormones gonadotropes.
Le principal ingrédient actif est la testostérone, l’énanthate de testostérone.
Le cycle de testostérone le plus extrême que
nous ayons vu est Anadrol/Tren/Test. Anadrol est également androgène, ce qui augmente le
risque de problèmes de prostate, de perte de cheveux (sur le cuir chevelu) et d’acné.
Dans l’ensemble, tandis que la testostérone énanthate offre des avantages significatifs
pour la croissance musculaire et le remplacement de la testostérone., les
utilisateurs doivent être conscients des risques potentiels.
Surveillance sanitaire régulière et utilisation responsable, y
compris un PCT approprié, sont cruciaux pour atténuer ces
effets secondaires. En plus, La poudre d’énanthate de testostérone peut avoir un influence santé cardiovasculaire.
Cela peut augmenter LDL (mauvais cholestérol) et réduire HDL
(bon cholestérol), augmenter le risque de maladie cardiaque.
Une utilisation prolongée peut également entraîner hypertension artérielle, notamment à trigger de la rétention d’eau.
⑦ Amélioration de l’humeur et de la santé mentale
Des niveaux de testostérone plus élevés sont associés à une amélioration de l’humeur et
de la fonction cognitive. La testostérone énanthate peut aider à soulager les symptômes de la dépression,
irritabilité, et fatigue chez les personnes souffrant d’un faible taux
de testostérone, améliorant ainsi le bien-être général et la
qualité de vie.
Pour les débutants, il est recommandé de commencer avec une dose de 250 mg par semaine, répartie en deux injections
de 125 mg chacune. Les bodybuilders avancés peuvent augmenter la dose jusqu’à 500 mg par
semaine, répartie en deux injections de 250 mg chacune.
Il est necessary de consulter un professionnel de la santé avant de commencer
tout cycle de stéroïdes. La testostérone, l’androgène masculin principal, peut causer des effets secondaires androgènes comme la peau grasse,
l’acné et la croissance des poils corporels/faciaux à des niveaux élevés.
Le décanoate de nandrolone, un stéroïde moins androgène, peut être une
meilleure choice pour les préoccupations de perte de cheveux.
Les femmes risquent des effets virilisants comme l’approfondissement de la voix et
la croissance des poils faciaux.
Pour obtenir des résultats efficaces, il est essentiel de suivre un programme d’entraînement et un régime alimentaire
appropriés. Lorsque vous choisissez le bon stack, l’énanthate de testostérone est capable d’atteindre votre objectif de building
musculaire. Et la principale chose à laquelle vous devez faire consideration est son dosage.
La Testostérone Enanthate 300mg est un stéroïde anabolisant
puissant qui stimule la croissance musculaire, améliore la force and accélère la récupération. Son effet à libération prolongée permet une injection par semaine, idéale
pour les athlètes cherchant des résultats solides et durables.
④ Perte de graisse Alors que la testostérone énanthate est principalement utilisée pour la croissance
musculaire, il a également un effet significatif sur le métabolisme des
graisses. Il aide à réduire la graisse corporelle en augmentant le taux métabolique
de base (BMR), permettant aux utilisateurs de brûler
plus facilement les graisses tout en préservant
la masse musculaire, surtout pendant les cycles de coupe.
Biopten AdamLabs 1 ml est une testostérone enanthate estérifiée,
elle pénètre donc progressivement dans l’organisme à
la suite d’un processus anabolique prononcé. Une fois que l’athlète a
pris le médicament, l’absorption de protéines devient plus fréquente, ce qui a un bon effet
sur le bilan azoté. Il convient de noter que chez les hommes, l’hormone est produite par les glandes surrénales et les cellules de Leiding, chez les femmes, ce n’est que par les glandes surrénales.
La testostérone a un faible niveau d’activité, automotive elle n’a aucun lien avec les récepteurs aux androgènes.
Ainsi, il est absorbé par l’enzyme réductase, à la suite de quoi il passe dans l’hormone
lively dihydrotestostérone.
Habituellement, les hommes adultes le tolèrent bien, sans effets indésirables.
Étant donné que ce remède est en demande,
vous pouvez acheter testostérone enanthate en ligne sous un nom différent.
Avant de vous lancer dans la prise de Test E
250 mg, n’oubliez pas de dévoiler à votre médecin l’ensemble des médicaments que vous consommez.
Cela inclut non seulement les traitements prescrits et les médicaments en vente libre, mais aussi
vos vitamines et compléments alimentaires. Il est
important de respecter le dosage recommandé et de ne pas dépasser la période d’injection recommandée afin d’éviter les effets secondaires indésirables et
les déséquilibres hormonaux. Le médicament a des propriétés androgènes,
ce qui signifie qu’il stimule le développement des caractéristiques sexuelles masculines
telles que la croissance des cheveux, la profondeur de la voix et l’augmentation de la libido.
Bien que l’énanthate de testostérone soit très efficace, une utilisation inappropriée ou acheter testosterone; https://www.Adgcf.fr, abusive peut entraîner des effets secondaires.
Ceux-ci peuvent varier en fonction de la tolérance individuelle
et des dosages. Bienvenue à Acheterstéroïdeà vendre, votre source fiable de
haute qualité poudres de stéroïdes. Nous proposons une giant gamme de stéroïdes anabolisants premium,
y compris Testostérone, Trenbolone, Nandrolone, Équilibre, Masteron, Anavar, Winstrol, et Dianabol, pour aider les bodybuilders à atteindre leurs objectifs de remise en forme.
Pour ceux qui cherchent à créer leurs propres options injectables, la poudre d’énanthate de
testostérone est disponible. Cette poudre d’énanthate de testostérone brute peut être préparée sous forme injectable, offrant flexibilité en termes de dosage et de rentabilité.
De nombreux athlètes choisissent d’acheter de la poudre d’énanthate de testostérone en ligne pour plus de commodité et de qualité..
Bien que le cardio soit la dernière chose qu’un bodybuilder
veuille faire lorsqu’il prend du quantity, il protégera
votre cœur, ce dont vous serez reconnaissant dans les années à venir.
Anavar est généralement considéré comme un stéroïde
coupant, en raison de ses puissants effets brûle-graisses.
Cela est dû à la capacité d’Anavar à augmenter le
rapport entre T3 et T4 dans le corps, en stimulant le métabolisme et la perte de graisse.
Malheureusement, de nombreux websites Internet ne se soucient pas de la qualité de leurs produits.
Comme beaucoup n’acceptent que des méthodes de paiement douteuses, comme le bitcoin, il leur est facile de ne pas rembourser leurs purchasers.
L’efficacité de ce médicament a été prouvée, donc si vous souhaitez atteindre vos objectifs
sportifs plus rapidement, achetez le médicament sur le website Pharmacie-du-sports à un prix
abordable.
Each will provide comparable power, muscle mass,
and aesthetic gains. Anavar provides you with an edge for muscle development and total
physique composition, but if energy is a primary objective, you’ll discover RAD-140 is equal
or higher. Let’s now look at different essential aspects when comparing SARMs to anabolic steroids.
These involve comparing the protection, administration, legality, and
side effects. Dandelion Root (500mg daily) or Hawthorn Berry (500mg daily)
are natural dietary supplements that some will discover effective at combating water retention in combination with the dietary ideas above.
You can use merchandise that steroid customers typically use to combat hair loss (just how efficient they
will be will rely lots on your genetics). Remember that SARMs-induced hair
loss will usually be momentary, not like steroid-induced male sample baldness, which
may be permanent.
Post Cycle Therapy (PCT) should begin immediately after your Anavar cycle
has ended. This is as a result of Anavar has a half-life of around 9 hours,
meaning that it will be out of your system relatively
quickly. Starting PCT immediately will help to restore your pure
testosterone levels and forestall any potential unwanted aspect effects.
PCT is critical after using Anavar to help restore the body’s pure hormone manufacturing.
This may help to cut back the risk of these unwanted side effects and ensure that the positive aspects made
during the cycle are maintained. Following the most effective PCT cycle
after steroids helps restore your body systems to steadiness.
Whereas your testosterone can nonetheless return to regular levels with
none intervention, the process could be quite gradual.
Think About a dosage of 0.25 to 0.5mg twice weekly during your cycle.
For extra in-depth information on Cabergoline, see my in-depth Cabergoline PCT guide.
HCG can deliver on some estrogenic and androgenic
unwanted side effects at greater doses. So,
if you should take larger HCG doses, you should consider using an AI alongside it, with Aromasin being the superior alternative.
This excessive dose will increase the severity and probabilities of getting unwanted
aspect effects manifold. Sustanon is probably considered one
of the steroids that could be stacked with
many other steroids including Dianabol and Deca to make
sure quicker ends in the health club. A lot of bodybuilders actually opt for a
Deca, Testosterone and Dianabol Cycle when bulking for
a competition. The addition of the thyroid hormone Cytomel in this superior cycle
assists in regulating metabolism and power.
These for a lot longer superior cycles that stack multiple
steroids are superior cycles.
Then, modify your dosage as you’re snug, adding 5-10mg to every compound
for the remainder of the cycle. LGD-4033 will allow you to put on spectacular size and see a notable improvement in muscle power,
so you’ll be ready to raise heavier and increase the depth and length of your exercises.
MK-677 increases muscle positive aspects and speeds up the lack of subcutaneous fat,
so if you’re after a greater muscle definition,
this stack supplies that particular profit.
With this comes some of the more serious side effects we are going to see
with any SARM, but not everyone could have the same experience!
The secret is to work out how your physique reacts to Testolone and modify your dosage and cycles to
get one of the Best Pct For Dianabol outcomes from this compound.
It certainly has nice potential to be an even more smart choice than steroids for a
critical bulking cycle.
Winstrol, Anavar, and Trenbolone are famend for his or her muscle-preserving properties.
The highest doses of mg per day are usually only
really helpful for advanced, skilled customers under medical & expert advise.
At these elevated ranges, the muscle-building results are maximized, however the dangers of unwanted side effects also increase considerably.
Shut monitoring is required to rapidly determine and handle any antagonistic reactions.
One of the necessary thing reasons bodybuilders utilize Dianabol is
for its unparalleled ability to facilitate clear bulking and muscle
acquire cycles.
You might need it for as little as two weeks,
but when you’re more suppressed, this will prolong PCT to four
or even six weeks. Cardarine won’t shut down your testosterone, however Andarine
could be suppressive, so it’s important to have a PCT plan prepared for the top of this cycle.
Ideally, a PCT cycle of no less than two weeks is required; in rarer cases, you may need as much as
four to 6 weeks. Nolvadex is the most effective SERM for a SARM PCT, and
20mg day by day will be sufficient in most cases.
In one study, participants reached sleep 36% quicker after a single dose of valerian (38).
A technique to forestall overstimulation is to
take Anavar doses earlier within the day. A common scam we now have been made conscious of is sellers
labeling products as Anavar, but the uncooked ingredient is Dianabol.
It is decided by the specific SARM used, the length and dosage of the cycle, and particular person health factors.
In addition to this, it’s essential to comply with a well-structured protocol tailor-made
to your particular wants and cycle. Then once more, the period and specific drugs used in PCT can differ relying on components such as the kind of SARMs used, the length of the cycle, and individual hormonal responses.
RAD-140 has a strong impression on the body’s hormonal system and is understood to cause vital suppression of testosterone.
PCT is mostly recommended after using RAD-140 to help in recovering testosterone.
Total, each of these substances performs a distinct function in the restoration course of
after a SARMs cycle. Clomid and Nolvadex primarily assist
by enhancing testosterone through hormonal signaling, whereas hCG immediately stimulates the testes.
My passion has at all times been bodybuilding but with 15 years’ experience in weight loss programs too,
it is onerous not to point out all that when you’re working at your health stage fullest (I hope).
When Im not within the gym or spending time away from my household i
often take into consideration what advice would assist others obtain theirs
goals similar to these impressed mine. Dianabol is an artificial derivative of testosterone, chemically modified as
a C17-alpha alkylated compound to survive oral ingestion. It has a short half-life
of about 3–6 hours, necessitating split doses all through the day.
SERMs, on the opposite hand, target particular estrogen receptors and are
used to deal with critical situations like breast most cancers, as well as menopause,
osteoporosis, and infertility. Bodybuilders use SERMs in post-cycle
therapy to fight the appearance of gyno that comes about from elevated levels of estrogen following a cycle of steroids.
A PCT cycle can last anyplace from three to six weeks, depending on the steroid cycle you had been on and the PCT medication you might be using.
70918248
References:
none (Isidro)
70918248
References:
none (travelergama.com)
70918248
References:
none (Jeanett)
70918248
References:
none; naturaverdebiobaby.it,
70918248
References:
how much steroids cost
70918248
References:
Supplement Steroid (Yasuda.Shop)
70918248
References:
anabolic steroids Stacking, gbx9.com,
It is increasingly being studied as a natural various to steroids
for athletes in search of higher power and endurance positive aspects.
Zinc is a natural supplement that gives a superb
alternative to unlawful anabolic steroids.
Most legal steroids don’t include banned substances, however it’s
necessary to check the WADA list or your sport’s banned record if
you’re a competitive athlete. A quality steroid replacement is ready at a reputed facility and contains elements supported
by scientific research. A superior legal steroid may enhance both testosterone and insulin-like development issue to
facilitate muscular building.
These natural steroids are authorized and have a list of ingredients that
only include natural compounds, similar to nutritional
vitamins, amino acids and minerals. Winsol by CrazyBulk is the subsequent name on this best legal steroids record, and it’s an amazing alternative for someone
who desires increased fats burn and muscle achieve at the identical time.
In Accordance to the official website, it enhances vascularity and cuts the
body fats ratio, which provides an opportunity for the muscles
to develop better.
With its every day consumption, you can achieve all the necessary advantages, together with muscle constructing.
CrazyBulk Anadrole is among the most well-known names within the pure and authorized
steroids market. It was created with organic components by professionals who
wished to help folks enhance muscle mass with out using unlawful anabolic steroids.
One of the most effective ways to verify the effectiveness of legal steroid options is by precise user
evaluations and before-and-after pictures. Most users &
bodybuilders who’ve included these legal steroid-like bodybuilding tablets for &
have lost vital fat alongside strength features.
CrazyBulk Winsol is obtainable in a pack of 90 capsules, and the company advises
taking three capsules every single day for a couple of weeks to
witness the results. Some elements inside have an effect on testosterone manufacturing, resulting,
matchless health,h vitality, and power. For more experienced athletes
and weightlifters, a more superior complement like HMB
could be what steroids do bodybuilders use, http://www.heritagegloves.com,
you want to push past your current plateau and enhance muscle mass and energy.
You aren’t more likely to get any tangible profit from
steroids in meals; you’ll must generate an anabolic hormone profile
by way of an alternative method to spice up your power and muscle
mass. While research continues to be ongoing, you’ll discover rhodiola
in some of the natural steroid alternate options on our list
due to the promise from this preliminary proof. Well-renowned for its testosterone-boosting abilities among bodybuilders, Testo Xplode
is an efficient choice for anyone seeking to boost testosterone
levels without relying on a prescription steroid.
Bodybuilders largely use it now to enhance restoration while you’re
sleeping–by boosting testosterone and development hormone ranges, you enhance your recovery and enhance your sleep
high quality.
We seemed for effective elements like D-aspartic acid and different amino acids but in addition checked
to make sure there were no filler elements, similar to
soy or artificial additives. Rising muscle development is a fancy course of that takes
time, serious effort, and a superbly balanced diet. If you are struggling
to realize your muscle goals on your own, D-Bal Max could give you the added nutrients you should bulk up.
It just isn’t technically a natural steroid, but it has some confirmed advantages for muscle progress.
Natural steroid supplements are compounds that act similarly to the
steroids that the human physique naturally produces,
such as the hormone testosterone. Testo Prime can enhance testosterone manufacturing by up
to 44%, serving to you regain your power, drive, and zest for life—without synthetic hormones or harsh chemical substances.
Nevertheless, slicing is much less complicated for some athletes than others,
leading many to make use of a chopping stack to assist their slicing efforts.
D-Bal accommodates potent elements that can enhance VO2 max, enhance physique fat reduction,
and allow you to sculpt lean muscle tissue. Even better, this
supplement can scale back muscle soreness and pace up tendon therapeutic, both
of which can help you get again into the gym faster after intense workouts.
Testo-Max presents a one hundred pc money-back assure, giving you confidence when attempting this legal steroid alternative for yourself.
Additionally, whenever you order Testo-Max supplements, you will obtain a free e-book from CrazyBulk with ideas and tricks to get
the most out of your muscle-building workouts. The D-Bal Max creators crafted this supplement’s formula
to produce dependable advantages for muscle strength in three main ways.
First, these drugs can enhance protein synthesis throughout your physique.
According to the official web site, it works in addition to Trenbolone, a synthetic steroid that is banned for
health dangers. If you may be looking for something to enhance
your exercise performance, try a natural performance booster, but do a proper background check
earlier than finalizing one product. The diversity in authorized steroids may be confusing, and
finding one of the best natural steroid alternative can be irritating.
However it becomes simpler when you come across a bunch of highly
recommended merchandise you could evaluate and select the one
product that appears best. One of the most important reasons fitness enthusiasts are turning to authorized steroids and
pure supplements is safety. In Contrast To anabolic steroids, that are
recognized for liver toxicity, hormonal crashes, and authorized penalties,
fashionable supplements are designed to be both efficient and
side-effect-free.
There are so many options in authorized steroids that work as robust as medicine.
And this greatest product may be different for everyone, based on particular person necessities.
Discover some choices before settling for one product;
ideally, the supplement of alternative should repair the issues
you may be facing and should be easy on the
finances too. Many instances, firms disguise their product-related info and promote an inexpensive, fake, or dangerous
product, calling it safe for extended use.
It’s best to focus on sustainable, healthy methods to
build muscle and stay match. You’ll also stop the attainable
physical and psychological harm of relying on synthetic substances to realize
the level of fitness you want in the course of. Steroids, legal or not, are never the best answer for building muscle or getting fit.
They may cause many unwanted side effects that may threaten any progress you’ve made in any respect and have long-term health penalties.
As with different OTC dietary supplements, look
out for additional ingredients that can cause allergic reactions or long-term health effects.
Some authorized supplements do have science on their facet and
aren’t totally unsafe.
Ginseng is legendary for possibly elevating physical stamina and
decreasing muscle tiredness. It helps in preserving muscular tissues strong and
boosts vitality ranges, essential for intense training. Ginseng may also assist immune operate
and lower inflammation, making it a solid alternative for
enhancing performance.
As the constraints and potential unwanted side
effects of cortisone injections become extra widely recognized, the demand for efficient
alternative pain administration options
has grown. Pushing for natural bodybuilding means more than simply gaining muscle tissue.
This article has shown other ways to avoid conventional
steroids. One Other is ashwagandha, which was proven in 2018 to assist grow muscular tissues.
Feeding your body with sufficient nutritional vitamins and minerals like magnesium for less muscle damage, proteins, and good
fats is vital for lasting muscle development. In Distinction To anabolic steroids, it’s
only a blend of zinc, magnesium, and vitamin B6. Which mixed can enhance testosterone ranges and aid in constructing lean muscle mass.
Muscle, weight, and energy features on Anadrol are
often unsurpassed, with Dianabol being the one compound that
comes shut in our experience. Dianabol was first created to
be significantly more anabolic than testosterone however with less androgenicity.
If there may be one thing Loopy Bulk may do to improve, it might be to decrease their costs even further
and increase their common evaluate score from 4.4/5 to 5/5.
Tom Coleman is a WBFF world champion who has over 1 million followers on Instagram.
He has previously beneficial Loopy Bulk on his page,
together with a hyperlink to their official website.
And sure, I’ve looked at options, the most affordable one is Dulara at $780+ for three months.
Sadly, these medicine have less of a desired impact than Apoquel and usually are not really helpful for
long run use. Just like immune-suppressing medicine used in people, Apoquel is
linked were To buy anabolic steroids an elevated fee of
an infection in canines. The most common infections are
Demodex mange, ear infections, and pneumonia. It is due to the potential for critical
an infection that this drug cannot be utilized in dogs under a yr of age who naturally have
weaker immune methods. A 2018 study concluded that
canine suffering from osteoarthritis experienced a significant lower in pain once they
have been administered with CBD oil.
As A Outcome Of these drugs suppress the immune system, you may be extra prone to develop infections when utilizing them.
A widespread facet impact of TCIs is a gentle burning or stinging after making use
of the treatment to the pores and skin. This ought to last for about 15 to 20 minutes,
based on the Nationwide Eczema Society. We’ve partnered
with Gold Bond® to deliver you this text on steroid-free ways to
treat eczema. Additionally, way of life modifications, such as reducing alcohol consumption, stopping smoking, and sustaining
a wholesome weight, can help total inflammation administration and enhance well being outcomes.
DermaMed Rescue Balm is the end result of years of analysis that has led to the development of this
extremely effective, all-natural topical remedy for psoriasis.
Pure botanical extracts and pure therapeutic ingredients
synergistically goal the varied inflammatory factors
involved in the pathogenesis of psoriasis. Relieves even extreme therapy-resistant psoriasis, with none side effects.
Traditionally, Pred Forte has been the main possibility for intraocular inflammation treatment.7 Research
reveals Pred Forte has varying anti-inflammatory advantages
compared with the generic formulation.
Upon noticing any of these discomforts,
seek clinical help from an expert healthcare setting. Blood checks could be performed
to verify the person’s present degree of testosterone and decide whether it is greater than normal.
Blood ranges of other reproductive hormones (such as follicle stimulating hormone [FSH], luteinizing hormone [LH]) can additionally
be measured. If the testosterone is very excessive however the
FSH and LH ranges are low, this supplies evidence that the particular person is using anabolic steroids.
Beta-alanine is an amino acid that increases carnosine ranges in muscles, lowering fatigue and bettering endurance.
By delaying the onset of muscle fatigue, beta-alanine helps you push via extra intense exercises, leading to higher muscle development over time.
It is a beta-2 (beta 2) agonist prescribed overseas as a
bronchodilator, however not permitted for use in this nation. It is on the banned substance list of the Usa Olympic Committee.
To avoid any erosion of confidence, physicians caring for
athletes need correct data concerning clenbuterol.
Such info is unavailable within the routine medical environs.
No investigation into long-term cardiovascular
unwanted effects has been undertaken. The
fee of extrapolation from animal studies to unsupervised human usage is alarming.
It promotes fast mass muscle features and provides
an incredible improve in power, stamina, and muscle strength.
It also provides a rise in your metabolic fee
and lets you shred without muscle loss. Cortisone injections have lengthy been a go-to therapy choice for people affected by various forms
of pain, together with joint ache, irritation, and musculoskeletal issues.
These injections, which include an artificial version of the naturally occurring hormone cortisol, are designed to
scale back irritation and alleviate discomfort.
In truth, some research have shown that Deca Durabolin may
help to extend strength by as a lot as 15%. For girls who want
to construct strength and enhance their total well being,
Deca Durabolin is definitely price considering.
This makes Deca a perfect steroid for girls who’re in danger for osteoporosis or who have already been recognized with the situation.
My hair is so thin, it could have slowed down these past couple
of weeks however I’m nonetheless shedding really.
Anavar is hepatotoxic, which means that it could damage the liver
if taken for too long or at too high of a dose. For this purpose,
it is essential to monitor liver perform when utilizing Anavar and to keep away from taking it for greater than eight weeks.
Different steroids, such as Anavar or Clenbutrol (a Clenbuterol steroid alternative),
improve metabolism and lipolysis while sustaining
lean muscle. They are less androgenic in character, hence safer to be consumed by ladies on steroids
in acceptable dosages.
For this cause, it may be very important pay consideration to any
psychological changes you might experience when taking Anavar.
Anavar has been proven to extend ranges of dangerous cholesterol (LDL) whereas decreasing levels of good ldl cholesterol (HDL).
It is necessary to observe your levels of cholesterol
when utilizing Anavar. Clenbutrol (Clen alternative) and Anvarol
(Anavar alternative) allow girls to lose stomach fats and exhibit abdominal
muscles sooner with the mixture of a lean food regimen and core exercises.
Legal steroid products like Win-Max and Anvarol increase endurance, velocity, and regeneration, making them excellent for feminine athletes who crave a bonus with no harsher unwanted side effects.
Drug detox can differ in accordance with the patient’s dependancy
components, together with the substance abused, how long the habit has lasted,
the patient’s medical situation, if another disorders
are current, and more. Anavar may be protected when used underneath
a doctor’s supervision for medical functions.
Again, this course of is critical for muscle development and preventing muscle loss throughout cutting cycles.
If you’re concerned about any potential unwanted aspect effects of Dianabol,
remember to communicate to your physician earlier than starting any type of
remedy. Dianabol is a synthetic steroid that’s much like the
hormone testosterone. It is commonly utilized by bodybuilders and athletes to extend muscle mass and strength.
Long-term use can cause the body to provide too many red blood cells and
abnormal levels of fat (lipids) within the blood.
Low-density lipoprotein (LDL)—the bad—cholesterol levels enhance,
and high-density lipoprotein (HDL)—the good—cholesterol ranges lower.
Topical corticosteroids can lead to skinny skin, pores and skin lesions
and pimples. Inderal (propranolol) is used to deal with angina,
hypertension and coronary heart rhythm disorders …
Dupixent is used to treat eczema, eosinophilic
or oral-corticosteroid-dependent bronchial asthma, chronic …
Blurred imaginative and prescient and simple bruising have
been reported with steroid use.
Nevertheless, choosing any of these two must require medical intervention to
avoid experiencing withdrawal. Moreover, anabolics can scale back the blood move to the penis,
therefore reducing libido and causing impotence. The decreased
blood move and the difficulty getting or sustaining an erection can cause a user’s
penis to look smaller, although the length suffers no factual adjustments.
All info offered in featured rehab listings is verified by the facility officials.
The particulars are saved updated to assist folks with dependancy treatment needs get essentially the most full and
precise details concerning the rehabilitation facility.
You are encouraged to report adverse side effects of pharmaceuticals to
the FDA. Steroids, additionally called corticosteroids, are anti-inflammatory medicines
used to deal with a variety of situations.
Primobolan is generally not considered the best sole compound
for this length cycle because you would typically
wish to use it for greater than eight weeks. PCT is used to hurry up the restoration of your pure testosterone manufacturing after it’s been suppressed or even entirely shut down when you use anabolic steroids.
Without PCT, you’ll suffer from low testosterone symptoms, which
could be life-ruining, to say the least. Trenbolone and Anavar can be stacked collectively during bulking or
cutting cycles, leading to appreciable fats loss and large features in muscle mass.
Nevertheless, because of the presence of trenbolone, we think about this to be a harsh cycle and not
suitable for novices. Beforehand, we cited a examine that
stated males taking 20 mg a day for 12 weeks skilled a 45%
lower in testosterone levels.
Utilizing Primo for chopping will harden your muscular tissues, enhance vascularity, and assist preserve your
current muscle tissue whereas weight-reduction plan. Primobolan is a DHT-derived steroid, putting it in the same category as revered AAS like Masteron, Winstrol, and Anavar.
This means Primo retains most of the properties and actions of DHT itself, specifically that
there isn’t any estrogen aromatization exercise – eliminating the
danger of water retention and gyno. Primo is commonly used
to control and stability estrogen ranges when using aromatizing steroids.
To put this 150 mg dose into perspective, it’s 6x the recommended dose of 25 mg per day.
It can additionally be 3x the dose of a male bodybuilder, who can experience significant results on 50 mg per
day. Nevertheless, analysis and our experience recommend that Anadrol doesn’t produce the identical androgenic effects in women.
Elite athletes in each main sport, together with weightlifting,
tennis, cycling, soccer, operating, boxing, wrestling, and golf, have been caught utilizing gear.
As we navigate the complexities of bodybuilding, it’s important to view the utilization of steroids in context.
Whereas they are a half of the sport, they do not outline it.
This can translate into boosted velocity, energy, endurance, and muscle recovery.
Male athletes can benefit from these positive effects
with out the priority of gaining extra muscle, which is in all probability not desired physically or aesthetically.
Small doses and quick cycles are essential for using Halotestin safely.
Even 10mg daily of this oral steroid will provide very noticeable benefits.
No greater than 40mg daily should be tried, and cycle lengths
of now not than 4 weeks are required because of the excessive fee of liver toxicity.
Medium cycles restrict you from making the features you want throughout these few weeks, so you’ll be pretty restricted to faster-acting compounds.
Testosterone Propionate is often the ester of alternative for a medium
cycle. Unlike biking, the place you might abruptly cease utilizing steroids entirely at the end of a
cycle, pyramiding permits you to taper off slowly.
All The Time consult a licensed healthcare provider before contemplating any hormone-related intervention, cycle planning, or post-cycle remedy.
Misuse of those substances carries severe health dangers,
including hormonal imbalance, organ stress, infertility,
and cardiovascular issues.
Dauda’s confidence was sky-high when discussing the upcoming showdown. On prime of those talked
about, Walker will tackle his teammate, reigning
two-time 212 Olympia Shaun Clarida in Ohio as well. The 2021 Arnold Basic champ
is expected to face a few athletes he recently battled in opposition to in Las Vegas, Nevada last month.
Mamdouh ‘Big Ramy’ Elssbiay and William Bonac will search revenge after their shocking turnouts at Olympia.
Following 2022 Olympia, Walker said he’s loved excessive carb days and
cheat meals however revealed his weight has remained regular.
Nick Walker is among the IFBB Pro League’s largest stars in the Open class.
Talking with Man Cisternino, Walker gave his ideas on steroids before discussing his current preparations for the nearing Arnold Basic, taking place March 2-5, in Columbus, Ohio.
Figuring Out the half-life of a steroid you’re taking
makes it easy to plan your cycles and know which steroids to use and how Much are steroids lengthy
you should use them. With Out this constantly excessive protein consumption, growth shall
be restricted, and steroid use shall be considerably wasted
since you won’t get the specified outcomes. It’s not
simply protein you’ll be planning out – carbs and fats
are simply as critical.
Suppose of anabolic steroids, and the name Dianabol (Dbol) is usually
the primary to come back to your thoughts. It’s long been the preferred and respected steroid,
and for good reason. The majority of anabolic steroids you hear about are one form or another of testosterone and usually synthetic derivatives of testosterone.
Walker shared that he doesn’t like to make use of orally administered steroids during
the low season. The solely method to use steroids legally is to have
a prescription for them. Corticosteroids are basic steroid medicines that cut back irritation and dampen the
activity of your immune system. They’re lab-made to
work like cortisol, a hormone made by your adrenal glands.
Most testosterone esters are suspended in oils like sesame oil or cottonseed oil.
Anavar (oxandrolone) is an oral anabolic steroid usually utilized in cutting cycles to cut back
fat and build muscle. A few of our patients have skilled insomnia or problem sleeping on anabolic steroids, including Anavar.
This can persist for the primary few weeks of a cycle, and then sleep patterns typically enhance.
In Thailand, the regulation states that Anavar shouldn’t be issued out through a prescription as a end result of anabolic
steroids being Class S managed drugs. Nevertheless, bodybuilders visiting Thailand have
reported buying Anavar from local pharmacies with ease.
Selective androgen receptor modulators (SARMs) are performance-enhancing substances that initiate anabolism by increasing muscle mass and restoration. If
you’re looking for a cycle support supplement that helps maintain wholesome levels of cholesterol
and promotes liver function, then Prometheuz
Suppz – Cycle Sustainer is a great choice.
Hair loss is probably considered one of the
most common unwanted facet effects of steroids.
Tell your doctor when you have any bone ache or if you have an elevated risk for
osteoporosis. If your youngster is utilizing this medicine,
tell the doctor should you think your child just isn’t rising properly.
If you are utilizing this medicine for a very long time,
inform your doctor about any further stress or nervousness in your life,
including other health issues and emotional stress. Your dose
of this drugs may need to be modified for
a quick while whilst you have extra stress.
The legal steroids are known by completely different names, and you’ll spot them by checking their choices.
Typically, all of these are known as fitness dietary supplements,
steroid alternate options, or natural anabolic dietary supplements.
In latest years, legal steroids have turn into in style alternatives to anabolic steroids for these seeking to achieve muscle mass,
shed pounds, and boost energy levels. These dietary supplements,
which could be purchased online, in gyms, and at stores.
They are legal to purchase, sell, and use as they do not
require FDA approval or a prescription. ZPHC is another leading manufacturer on the earth of anabolic steroids.
On a SARM cycle, you’ll have the ability to assist your liver by together with N-acetyl cysteine (NAC),
a semi-essential amino acid. I suggest together with NAC in all SARM cycles outlined in this information. Dandelion Root (500mg daily) or Hawthorn Berry (500mg daily) are pure supplements that some
will find efficient at combating water retention in combination with the dietary suggestions above.
So, on to the cycle… A simple 8-week cycle of Ligandrol at 5mg/day may
have a newbie making some very nice gains (remembering it’s all the time simpler to realize in your first cycles).
As A Outcome Of the SHBG binding affinity with SARMs is often much larger, and this causes a big improve in free testosterone18.
Elevated androgenic and estrogenic unwanted side effects – exactly the
things you hope to avoid through the use of SARMs. It can mimic the functions
of ghrelin, which boosts IGF-1 and progress hormone levels.
This raises your ability to grow muscle and lose fats simultaneously.
For this cause, most are inspired to implement a Submit Cycle Remedy (PCT) plan after
anabolic steroid use. Such a plan will generally embrace the SERM’s Nolvadex and Clomid, and sometimes additional HCG.
This will tremendously velocity up the recovery process, as
nicely as its overall effectivity. It will not return your pure
testosterone ranges to regular by itself, if
that is something you’ve been told it is a myth.
Start at the lower dose, and solely enhance if you need
extra help. Most steroid users choose to make use of AIs on cycles to mitigate estrogenic unwanted side effects, with selective estrogen receptor
modulators (SERMs) being more of a PCT selection. Post-cycle remedy is
crucial, and you have to do it as a result of your body’s regular
manufacturing of testosterone has been interrupted4. So, getting your take a look at again on track is a important purpose for undertaking PCT5.
Conventional anabolic Steroids symptoms include different authorized restrictions depending on where you live.
In some locations, anabolic steroids require a prescription, however there
are legal alternate options like Dbal and Win-Max you could buy without any points.
These options are available in the USA, Canada, Australia, and the UK, allowing you to access efficient products without worrying about breaking the law.
If you utilize Ibutamoren alone in a cycle, you presumably can expect moderate
muscle features of as much as 10 lbs. Whereas the potential fat loss results
are useful, they don’t seem to be as highly effective as with
some other compounds. MK-677 is a compound that some people can use with little problem,
while others don’t take pleasure in it as a outcome of they’re vulnerable
to the potential side effects. One Other serious risk is a
discount of excellent cholesterol levels that some customers have
seen, even at very low doses. Some hair loss can also occur as a
outcome of levels of DHT may be elevated.
It is a prescription-only treatment that may only be prescribed by a veterinarian. If your vet has
been prescribed prednisone in your canine, you might have lots of questions
about what the medication is, why it has been prescribed, and what
the potential unwanted effects are. Let’s discover out extra about this frequent canine medication, what prednisone does, and tips on how to assist your dog while she or he is
receiving this medicine. Dietary dietary supplements are often classified as pure health
products (NHPs).
This highly effective mixture of elements permits D-Bal not solely to
achieve vital muscle achieve but also quick recovery and maintenance of performance even throughout high-intensity exercises.
Steroids are able to storing extra water in the body,
which is usually generally identified as bloating.
Dbol increases water retention by elevating the quantity
of estrogen within the blood, which is a water-loving hormone.
D-Bal makes use of the assistance of Vitamin D3 and Magnesium to raise T
levels in your body. And since testosterone is the first muscle-building hormone in males, this enhance
in T levels results in sooner muscle progress. The two most common Dianabol unwanted effects are without query Gynecomastia (male breast enlargement) and excess water
retention or bloat.
The largest false impression here, is that because you take the next dose of anabolic steroids, it
requires more testing. You simply need to do extra testing, and it is much easier and extra exact to check that it’s carried out on the same day as the first “leg take a look at”.
You can get all of the info you needed to be positive
to are utilizing only the amount of anabolic steroids that might be required, just by doing several take a look at,
d ball steroid tablets unwanted effects. This could be
seen within the following diagram (below) displaying the effect of steroid hormones on the
protein synthesis response for varied doses of
testosterone (in red), d ball steroids value in india.
This is the reason why people can’t get a giant bench without training “taper” workouts, during which
the exercise volume is lowered by 50-75%, d ball steroid dosage.
In the comparison between Nandrolone and Dianabol, each steroids have their strengths
and issues.
Just like Deca, Tren can linger in your system for a chronic size of time,
and ongoing TRT or testosterone cruising is really helpful if PCT isn’t
effective. The suppression of testosterone makes it too excessive risk,
and that is why, at a bare minimal, Dbol ought to all the
time be cycled with a minimal of a testosterone compound like testosterone enanthate.
Zits and bloating are two of the biggest pet peeves, however
ladies who love Dianabol are often pleased to cope with the sides to succeed in size and strength goals.
Proviron is arguably most effectively used during a Dianabol cycle,
“acting as a wingman,” says Dr. O’Connor, to boost Dianabol’s anabolic properties while decreasing aromatization.
One good thing about taking Deca Durabolin vs. Dianabol is that its estrogenic exercise is low, with less aromatization occurring.
Thus, the risk of gynecomastia is significantly much
less on Deca Durabolin in comparability with Dianabol, albeit still
possible due to moderate progesterone activity.
Dianabol and Deca Durabolin (nandrolone) are
a potential combination to stack together when bulking.
We have discovered that a further 10 lbs of mass could be gained when adding testosterone or Deca Durabolin to a Dianabol cycle.
Consuming ample calories is equally important to assist anabolism and protein synthesis; thus,
a small calorie surplus of 500 or more is usually adopted on Dianabol.
A particular person may choose to eat upkeep
calories, particularly if they are acutely aware of their body fats growing.
At this stage, customers have acclimated to its results and might tolerate
integrating extra compounds like Deca Durabolin to help additional muscle improvement and restoration.
This enzyme converts testosterone to dihydrotestosterone (DHT), and DHT
is a serious cause of male pattern hair loss even when not utilizing steroids.
When DHT ranges are excessive, androgens are additionally excessive, and this will also
result in the development of pimples. Extended use of Dianabol and utilizing it at high doses places you susceptible to long-term unwanted effects and probably everlasting injury to your health.
Dianabol comes with a good larger threat of causing longer-term complications because
it’s an oral steroid.
Dianabol uplifts the estrogen levels within the blood, resulting in gynecomastia (enlargement of male breasts) and water retention. The same may be mentioned of cholesterol; your present condition and predisposition will play a large position. Additional, if you are wholesome and use responsibly youll more than probably be fantastic.
Nevertheless, it is all the time greatest to err on the aspect of warning and as such it is suggested you guarantee your diet is
rich piana steroids (Audium.com) in healthy fat, particularly these of an Omega Fatty-Acid nature.
Lets not overlook Omega Fatty-Acids are merely good for
you to begin with and play many important roles within the muscle game and
in our common overall health.
Although he by no means publically acknowledged its use, his confession of
getting used steroids and Dianabol’s widespread reputation throughout his glory days trace at its potential usage.
This impact is attributed to its androgenic properties, which can stimulate sexual need.
Nonetheless, it’s necessary to notice that the impression on libido
might differ between individuals, and other factors corresponding
to dosage, particular person response, and general hormonal stability can influence this effect.
If you are apprehensive about hair loss, talk to your physician about the potential for using
a unique steroid. There are a few things you can do to attenuate the danger
of hair loss while taking Dianabol. Nonetheless, it’s necessary to notice that combining Dianabol with different estrogenic compounds, such as Testosterone or Anadrol will also increase the danger of gynecomastia.
Swollen nipples are incessantly alleviated with
hormone therapy following a cycle; as soon as hormones have normalized (and estrogen levels drop),
they resolve.
These dangers are lowered by limiting a Dianabol cycle
to 6 weeks and avoiding excessive doses beyond 50mg
per day. As Quickly As once more, ldl cholesterol can turn out to be a longer-term
drawback when you use Dianabol too usually or at excessive doses.
When used moderately for short cycles and appropriate breaks between cycles combined with a good food plan, cholesterol levels
can return to regular in otherwise wholesome folks.
HCG is a naturally occurring protein that’s extracted from a
woman’s placenta.
If you’re a person and your T levels drop below 300 ng.dL
your physician will diagnose you with a situation called hypogonadism – clinically
low testosterone levels. We have had patients
who took steroids and did not train, and they constructed muscle and burned fat
regardless of being sedentary. Nevertheless, their outcomes
are notably much less compared to customers who combine steroids with weightlifting.
Winstrol’s results are just like Anavar’s, permitting customers to cut back fat
mass while including reasonable quantities of muscle tissue.
Deca Durabolin’s weak androgenic nature, when mixed with excessive
prolactin ranges, causes cases of erectile dysfunction.
When androgen levels are insufficient, nitric oxide (NO) concentrations
decrease.
This article aims to make clear anaobolic hormones lname
what (Tawanna) TRT and steroids are, how they work,
and which one would possibly suit your particular wants.
Testosterone and performance-enhancing steroids both provide potential advantages
for muscle progress and athletic efficiency. Although testosterone is
a naturally occurring hormone throughout the body, synthetic varieties could additionally be given underneath medical supervision to people who don’t make sufficient.
Testosterone Enanthate promotes muscle growth through a
number of actions, one being elevated purple blood
cell production and one other enhancing protein synthesis.
Muscle tissue is constructed at a sooner price when the process of protein synthesis is increased.
T may be topic to additional structural changes leading to the production of dihydrotestosterone 4 or estradiol (Figure 1).
T can be produced pharmaceutically from androstenolone (5,
Determine 2) by the reduction of 17-carbonyl and oxidation of the 3-hydroxyl with using
essential defending groups. This structural conversion is
attained by means of yeasts, which first oxidize the 3-hydroxyl
underneath aerobic situations, then cut back the 17-keto group under anaerobic circumstances (Figure
2A). Additionally, 5 can be further synthetically modified by alkylation on the C-17 place and successive
oxidation resulting in potent anabolics 17α-methyltestosterone 6 or methandienone
7 (Figure 2B).
While it is a profit, for many customers, the downsides will outweigh the dearth
of liver toxicity, including the high price of the product when contemplating the excessive dosages wanted to reap essentially the most benefits.
As we count on, the positive feedback from men who run a
Testosterone Enanthate cycle focus on the amount of lean positive aspects being
made, the elevated energy, and the increase in psychological well-being and libido.
Muscle gains of 15lbs and as a lot as 25lbs are a possibility for brand spanking new steroid customers on Testosterone Enanthate.
As Soon As your testosterone base is in place, the subsequent
step is selecting which compounds to pair based mostly in your goal.
This is the place stacking gets strategic — completely different mixtures affect water retention,
androgenic load, recovery, and aesthetics in very alternative ways.
Earlier Than you build a steroid stack, you need to outline your major objective.
Every compound impacts the body differently — some promote size and power, others assist shed fats or maintain lean tissue beneath
stress. Your objective determines which compounds you utilize, how long you run them,
and what your total technique seems like. At its core, steroid stacking is about combining two or
extra anabolic compounds to reinforce results through synergy — not extra.
Every compound has unique strengths, half-lives, unwanted effects, and mechanisms of motion.
Animal research have shown that DMT’s anabolic results are stronger than androgenic activity.
The commonest side-effects are hepatotoxicity and
cardiac hypertrophy [61]. Tetrahydrogestrinone (THG; 27, Figure 6) is an orally energetic agent, also identified as ‘The Clear’.
THG is a particular synthetic analogue with a methylated C18 residue and a
system of three double bonds similar to trenbolone.
Thus, on Winstrol, we observe customers building slightly more muscle while experiencing
harsher unwanted effects. Therefore, novices don’t typically cycle Winstrol, as it
can trigger excessive ranges of hepatotoxicity and cardiotoxicity.
This stack was some of the prominent steroid cycles from the Golden Era, believed to have been utilized by Arnold Schwarzenegger and other basic bodybuilders from the
Seventies. This steroid cycle is a more normal protocol amongst intermediate steroid customers.
However, we observe such elevations in blood strain to be delicate in comparison to more extreme anabolic steroids.
Thus, testosterone is the least cardiotoxic steroid based on our patient’s
lipid panels. We see orals typically changing into problematic
when used in excessively excessive doses or when customers don’t allocate enough day off in between cycles.
As a basic rule, the length of a cycle ought to
be equal to the length off of steroids. All anabolic steroids will improve blood stress as they’re all
variants of exogenous testosterone; thus, LDL ranges will rise and HDL levels will drop (4).
In the world of bodybuilding, steroid use stands as a prevalent follow, deeply intertwined with the pursuit of accelerated muscle
growth and enhanced efficiency. Its prevalence
emerges from the allure of fast muscle development and heightened bodily talents.
Nevertheless, this landscape is defined by polarised
perspectives, with divergent viewpoints on the position of steroids
in best muscle steroids improvement.
While some advocate for his or her potential to expedite positive aspects and bolster
aggressive edge, others caution in opposition to their dangers, highlighting issues about health, fairness,
and the integrity of the sport. This dichotomy underscores the advanced and multifaceted debates
surrounding the utilization of steroids in the pursuit of muscle development inside
the bodybuilding group.
For some, buying and selling one vice for another can be a transformative step in the path of a more healthy lifestyle.
Starting steroid use too early can have opposed results
on your health and improvement. We will elaborate on the notion of
when it turns into necessary to use steroids later in this article.
Additionally, it’s important to gauge your training program and food plan plan.
If these elementary parts aren’t so as, it is imperative to rectify them earlier than even contemplating steroid use.
Steroids usually are not a magic solution; they require rigorous
coaching and adherence to a correct food plan plan to yield results.
The nature of steroids is inherently powerful—capable of providing impressive advantages but also potential harm.
From that moment on, actually, being in that
La courtroom, I got here out of there and I had a model new perspective
on what I was going to do with my life. After the 2003 season, which was in all probability my most successful season on report, I had nice results, had
an enormous Tour de France. I obtained again stateside after the season was over, it was in my off-season, and
I realized I was having a tough time simply getting away from bed, no motivation. I mean, I thought about suicide, I drank to simply take a look at at some factors.
Pretty a lot each evening, if not every night at least every other night
time, I’d get up normally between two and three within the morning and simply sit there for
forty five minutes and stare on the ceiling.
I referred to as them committee conferences and just kind of take into consideration what
I was up to and the consequences if it all went unhealthy, how ugly
that was going to look. I knew most of my teammates have been doping at the time,
and I thought if I mentioned no to it, then I wouldn’t be selected to ride within the Tour de
France.
Athletes and bodybuilders are using these substances for varied functions, such as enhancing muscle
mass, strengthening their bodies, and enhancing their performances.
AAS exert a broad range of physiological results that outcome
in the activation of central signaling, leading to antagonistic effects.
Moreover, excessive use of AAS which could be categorized as
AAS abuse; is linked to organic and psychological
pathologies, which may lead to mortality. Complications arising from steroid abuse contain both cellular and physiological issues.
Medical complications budding from these altered physiological processes result
in clinical results like testicular dysfunction, zits, gynecomastia,
and neuropsychiatric problems. Despite potential therapeutic advantages, AAS use is prohibited by the
World Anti-Doping Company (WADA) because of considerations over opposed health effects.
Performance-enhancing drugs (PEDs) have been a topic of intense debate in sports,
fitness, and well being communities for many years. Trenbolone is a robust anabolic steroid
prized for its ability to advertise dramatic muscle development,
power positive aspects, and fats loss. One of the vital thing advantages of Trenbolone is its potency, making it one of the most effective
steroids for attaining vital enhancements in muscle
mass and definition. Trenbolone also enhances nitrogen retention and protein synthesis, which are
essential for muscle progress and recovery. In the aggressive world of
bodybuilding, athletes constantly search effective supplements
and anabolic steroids to reinforce their performance, construct
muscle, and obtain their health goals. Amongst these compounds, EQ 300 (Equipoise) stands out for its distinctive properties and potential benefits.
In conclusion, it is necessary to pay attention to the legal features of steroids.
Relying on the place you reside, the laws surrounding steroids can vary greatly.
In order to legally get hold of steroids, you’ll need a prescription from a licensed medical skilled.
If you’re caught with steroids and not utilizing a prescription,
you can face critical authorized consequences.
Additionally, it is necessary to analysis the legal guidelines
surrounding steroids in the international locations you’ll
be visiting if you’re traveling internationally.
After the debate, 37 percent of audience members agreed with the proposition. In the latest debate, held on Jan. 15, the formal
proposition was, “We should accept performance-enhancing medicine in aggressive sports activities.”
Aggressiveness and urge for food may increase, especially with high doses.
In youthful adolescents, steroids can intrude with the development of arm
and leg bones. It all comes all the way down to your goals, your
present state of health, and your private tolerance for dangers both legal and physical.
In fact, measuring muscle protein synthesis is the “driving force” and
primary measurement of how your muscular tissues adapt
to your coaching regimen.
A person on steroids will know behind their mind that she or he
wants the stuff to be on prime. It’s like that old
saying that I have, “if you are sad with your self being poor, then you will never be proud of yourself being rich.”
You have to offer credit score to bodybuilders as we’re
most likely the hardest staff in sports history. In other words, if you are going to sit at a desk all day and
the one train you get is from lifting your arm to get those candies next to you, you
aren’t going to have the body of your goals.
Many consider that using these medication undermines the worth of sports as a showcase of human ability, onerous
work, and dedication. Misuse of PEDs, particularly in combination with different substances, can have unpredictable and dangerous
consequences for the user’s well being. In women, PED
use could cause menstrual irregularities, deepening of
the voice, and excessive hair development. These hormonal modifications can have long-lasting results
on an individual’s well being and well-being.
Because we’re using steroids for efficiency enhancement and bodybuilding, the compounds are being taken at doses a lot higher than if they had been used for medical purposes.
Implementing a post-cycle remedy (PCT) protocol after finishing an Anavar (Oxandrolone) cycle is
essential for restoring natural hormone manufacturing and maintaining optimum
health. Whereas Anavar is considered a relatively gentle steroid with
low threat of testosterone suppression compared
to different compounds, it may possibly nonetheless trigger
some stage of suppression. PCT aims to mitigate the potential negative results of suppressed testosterone levels and help the body regain its natural hormonal
balance.
Anavar can offer vital benefits such as elevated muscle mass, improved power, and enhanced athletic efficiency.
However, it is essential to prioritize security, authenticity, and quality when buying
Anavar. Completely research reputable sources, verify
product authenticity, and prioritize products that endure rigorous quality testing.
Additionally, consult with healthcare professionals or experienced
health advisors to ensure Anavar aligns together with your targets, total health, and
individual circumstances. To achieve optimum outcomes and minimize unwanted effects,
it’s essential to comply with a correct anavar cycle and anavar regimen.
Anavar will burn fat out of your body, and that may
create a chiseled face. Just keep in thoughts that genetics and how properly you maintain water can work
wonders to create that look. If ladies want a lot of bulk,
they can use a special steroid cream side effects long term (https://paladarplus.es)
or devour extra calories on prime of taking Anavar.
Nonetheless, it is necessary to note that Anavar 50 continues to be a potent steroid, and it ought
to be used responsibly. Like all anabolic steroids, Anavar
50 can have unwanted side effects, especially when used
in high doses or for prolonged periods of time. Some of the potential side effects of Anavar 50 embrace liver toxicity, testosterone suppression, and cardiovascular issues.
Anavar can be stacked with other steroids for elevated muscle growth
and performance. Nevertheless, you will want to consult with a healthcare professional before stacking steroids to find out the appropriate dosage and potential dangers.
It is unlawful to deliver Anavar into Mexico from other international
locations with out correct documentation and approval from the Mexican authorities.
Some of the greatest bulking steroids embrace Anavar (methenolone), Winstrol (stanozolol), and Clenbuterol (phenylethylamine).
These steroids are recognized for their fast fat-burning effects by
selling elevated thermogenesis, accelerating the breakdown of fatty acids, and
sustaining calcium levels within the physique.
Whether Or Not you’re trying to buy Anavar for
a slicing cycle or to enhance your athletic efficiency, you can find Anavar on the market at competitive costs on trusted websites like Beligaspharma.web.
But the important thing to success with these substances lies
not solely in the right cycle but in addition in sourcing them from reputable suppliers.
“, look no additional than beligaspharma.net—a trusted website that offers high-quality products like Anavar on the market, DBol on the market, and Clenbuterol on the market. The drug was originally used in post-burn remedy, the treatment of HIV, anemia and many other illnesses.
All products on this web site are intended for analysis and growth use only. They aren’t appropriate for human consumption of any sort.The statements made on this web site have not been evaluated by the us Our merchandise and the data offered are not supposed to diagnose, treat, remedy, or prevent any illness. Steroids are man-made chemical substances that mimic the hormones your body makes to assist your organs, tissues, and cells work appropriately.
Testosterone must be included in a sophisticated Anavar (Oxandrolone) cycle, even when at just a maintenance dosage of 100mg weekly together with your chosen ester, with propionate or enanthate being widespread decisions. A complete range of other steroids are generally stacked with Anavar, together with the highly effective fats burner Winstrol, Equipoise, Proviron, Masteron, or Primobolan. The finest testosterone esters are Testosterone Enanthate or Testosterone Cypionate, with once-weekly injections. PCT can be commonplace Clomid for 20 days – first 10 days at 100mg day by day, beginning two weeks from the tip of the cycle. The lack of threat of water retention is a serious benefit of Anavar and an enormous reason why it’s such a popular and potent cutting compound, including for competitive users.
Naturally, your food regimen should assist fat loss, which will all the time be the case on a slicing cycle. A typical PCT protocol after an Anavar cycle might involve using selective estrogen receptor modulators (SERMs) corresponding to tamoxifen or clomiphene. These drugs work by stimulating the body’s natural production of luteinizing hormone (LH) and follicle-stimulating hormone (FSH), which in flip promote the production of endogenous testosterone.
RHGH remedy has substantial therapeutic advantages for patientswith GHD.
The advantages of rHGH treatment in otherwise-healthy adults areuncertain. DECA-MAX is a authorized and safe various
to Deca-Durabolin, a widely known bodybuilding steroid.
Its formulation promotes protein synthesis, nitrogen retention, and
purple blood cell production. DECA-MAX strengthens tendons and ligaments by selling collagen synthesis.
Building up these connective tissues can ease joint pain from strenuous, repetitive activities.
Dietary Supplements like Testo-Max (Testosterone Booster) work by naturally
increasing your physique’s testosterone production.
It is often taken as two injections per day, the whole daily dosage being divided.
This unfavorable suggestions loop can be decreased by having high ranges of circulating testosterone and low levels of estrogen. HGH is liable for the speedy growth
and high metabolic price we experience as youngsters.
Can human development hormones really benefit getting older, just like the elusive fountain of youth?
In 1513, the Spanish explorer Juan Ponce de Leon arrived in Florida to seek for the fountain of youth.
If he got any benefit from his quest, it was because of the train involved in the search.
Corticosteroids, as an example, belong to a category of steroid medication which might be designed to tamp down inflammation by limiting the
immune system response. These medication are typically prescribed by
medical doctors to fight autoimmune diseases corresponding to rheumatoid arthritis as nicely as bronchial asthma and a
number of sclerosis. You might have been prescribed corticosteroids
in some unspecified time within the future, like hundreds
of thousands of different Americans. The time period “steroids” seems often in pop culture,
but most individuals who use it don’t necessarily understand the exact definition. Communicate with your healthcare skilled about one of the
best HGH dosage for your condition. Individuals who consumed 600 milligrams of A-GPC two hours earlier than resistance
train had increased HGH levels post-exercise in comparability with those given a placebo.
a hundred mg/week of testosterone can be added to this stack to increase anabolism without adding any notable water retention as
a end result of this low dose. Testosterone is usually taken alongside T3 and Anavar for the final
8 weeks of this cycle. We discover the gradual tapering of T3 during this cycle (with regular increases and reduces in dosage) is perfect to scale back unwanted effects and prevent endogenous T3 shutdown post-cycle.
This is a cutting cycle and one of essentially the most potent combinations for distinguished fat loss
in our expertise. Stacking HGH with testosterone will also have a transient
effect on testosterone levels, initially growing throughout a cycle but then decreasing post-cycle.
Consequently, low testosterone signs can persist for a quantity of months except sure PCT drugs are taken to restore the HPTA axis.
These adverse results happen as a result of heightened DHT ranges damaging
hair follicles on the scalp and the sebaceous glands changing into overstimulated, resulting in extra sebum secretion (blocking the pores).
And if recovery is the one benefit you’re after (truly valuable) as a end result of it’s
not as “visual” as mass and energy some turn into annoyed too shortly.
HGH became part of drugs within the 1950’s, and was first successfully utilized
in therapy in 1958. The type of GH used as this time was extracted from the pituitary of human cadavers.
This was practiced worldwide but banned by the FDA in the U.S.
in 1985. The use of GH extract had been linked to CJD and proven to be doubtlessly deadly.
Solely 1% of all GH users fell prey to CJD, but that was sufficient for the FDA and
nearly ended any hope of improving methods. When the FDA makes its thoughts up it could be
very difficult for anybody in the us to even attempt improvements.
Progress hormone stimulates the manufacturing of
IGF-1, which is produced within the liver and launched in the blood.
In girls, human growth hormone levels begin to decline of their 30s
(as a part of perimenopause), and will progressively decline approximately 15 p.c for each decade of adult life.
Indicators of HGH deficiency include dry skin, thinning hair, greater stomach fat and the
development of wrinkles.
HGH is then transported to areas of development,
similar to joints, the place they improve the growth and multiplication of tissues.
Human growth hormone (HGH) is a robust hormone that’s needed for a
number of important bodily processes. Generally, your pituitary
gland could make an excessive quantity of
or too little of it. If you or your child are experiencing signs related
to HGH deficiency or excess, it’s necessary to talk to your healthcare supplier.
All world-renowned manufacturers of hGH contain the same
active ingredient – growth hormone, which is produced by a singular DNA recombinant expertise with
the help of modified bacterial strains. In comparability, steroid hormones have a typical
molecular structure consisting of 4 rings made from 17 carbon atoms.
This construction resembles the considered one of ldl cholesterol, as all steroid hormones are produced from
it. In truth, hGH is an entirely totally different hormone in nature compared to Injectable Steroids For Sale – it
has a special structure, works in one other means,
and causes utterly completely different unwanted aspect effects when abused.
A large a part of the confusion may be due to the truth
that athletes commonly use (and abuse) both forms of
supplements.
So you’ll find a way to maintain and even improve your power output while cutting, which
is rare in bodybuilding. Anavar stacks nicely with different steroids making it an excellent base for chopping stacks.
Its synergistic effects will improve your general cutting cycle and offer you
even better results. It is all the time advised to be within the lower physique fat ranges when using
any steroid as this will assist to restrict any doubtlessly serious side effects and ensure a safer
cycle. In intermediate slicing cycles, the usage of a stronger oral steroid like Winstrol Steroids is widespread follow.
The downside with testosterone pictures is that they’re
not quite as pleasant to your body as naturally produced testosterone.
In fact, as men get older and their our bodies aren’t in a place to produce
as much testosterone as earlier than, they lose their
muscular tissues as they turn out to be extra easily
fatigued. Examine this Trenbolone review to study extra about tips
on how to use it to get most advantages and keep away from side
effects.
The cause why Anadrol isn’t listed as primary on this listing is because we have ranked steroids so as of professionals vs.
cons. The most popular testosterone esters are cypionate and
enanthate, as a outcome of their regular release and the fewer
regular injections required. Nevertheless, the primary downside to less androgenic properties is a decline
in sexual health. One way we have helped our patients to scale back nervousness
(and help soothe the CNS) is to increase L-tryptophan consumption.
It’s important to monitor how your body reacts
and make adjustments as needed. Some individuals might need to tweak dosages or timing
to optimize their outcomes. Anavar and testosterone undecanoate are one of the best
oral steroids for novices due to their gentle nature and few unwanted side
effects.
Potential for abuse and dependence is a threat with all
anabolic steroids, including Primobolan. Some customers could develop a psychological dependence
on the drug, feeling unable to maintain up their physique or efficiency with out it.
This can result in prolonged use, rising
the chance of severe health issues. While Primobolan (methenolone enanthate) is usually thought of one of the milder anabolic steroids, it’s essential to understand that its use nonetheless
carries important dangers and potential side effects.
A comprehensive understanding of those dangers is crucial for anyone contemplating
or presently using Primobolan.
Discover our assortment of slicing cycle products and fat burners from trusted brands.
Additionally, non-hormonal remedies corresponding to those discussed in our
fat dissolving injections Information are excellent add-ons for
localized fats reduction during or after a cutting cycle.
However, customers who want to decrease unwanted effects might take Anavar and Primobolan as
a end result of their decreased toxicity.
Primobolan is considerably androgenic (roughly half of testosterone), so
oily skin, zits, and hair loss are potential. Primobolan by itself is not going to get someone ripped;
however, it’s a helpful addition to any chopping stack as a end
result of its delicate toxicity.
We do not offer medical recommendation or specific guidance concerning
the merchandise discussed. Our insights are based mostly on a mix of anecdotal experiences, on-line studies/reviews, producer
details, and customer feedback. While we try to present correct and
current info, we cannot assure its completeness or its alignment with the latest product formulations or knowledge.
For any concerns or up-to-date info, we recommend visiting the manufacturer’s website directly.
The opinions and information provided here don’t necessarily reflect the views of Finest Worth Vitamin;
they represent the views and information from the producers and customers.
Furthermore, these statements have not been evaluated by the Food and Drug Administration. The products mentioned are not intended to diagnose, treat, cure, or prevent any disease
or illness.
To do this, we entered ‘#crazybulk’ and #dbal, together with different product names, into Instagram, Twitter, and Facebook.
Krill OilSupports inflammatory regulation, cardiovascular
health, and cognitive temper stability — all of which can fluctuate post-cycle.
Hormone fluctuations, protein turnover, and nutrient timing all
influence your results — and restoration. Monitor Your Body CloselyAt the first sign of voice modifications, hair development, or menstrual irregularities, stop your
cycle. These symptoms occur when androgen levels turn out
to be too elevated, typically as a result of stacking,
extended use, or excessive dosing.
The story of Upjohn is certainly one of science, drugs, commerce and
compassion. The company was based in 1886 in Kalamazoo, Michigan, by physician William E.
Upjohn and his brother Henry as the Upjohn Pill and Granule Co.
William Upjohn had patented a course of for making a pill capable of crumbling underneath
the pressure of a thumb and therefore being easily digested.
The enterprise prospered, and, in 1903, reflecting its broader portfolio, changed its name to The Upjohn Company.
As GamesRader factors out the effect of those new methods
is that in some instances , it’s truly the AFK farmers that
are being used for farming. “With my Dragon Breath strat and the physick , I’m preserving all the souls , and you do not have to be taking them out every once I die, after having killed the one who was hosting it,” wrote one participant on the subreddit.
“Have 50+ rune arcs just this morning from my assaults there are many people making an attempt this exploit and you can fill your stock with arcs , if you’d like.”
At this time, the Federal Meals, Drug, and Cosmetic Act, was invoked
to restrict the entry of steroids, making them available solely by prescription. Systemic corticosteroids refer to corticosteroids which may be given orally or by injection and distribute all
through the physique. It doesn’t embrace corticosteroids used within the eyes, ears, or nostril, on the skin or which are
inhaled, although small amounts of those corticosteroids could
be absorbed into the body. Dragon Pharma is committed to delivering worth to its
customers and shareholders by remaining versatile and responsive to change, meeting
customers’ wants and exceeding their expectations.
We deliver worth by way of the experience of our technical growth staff,
the excellence of our state-of-the-art manufacturing facilities and our commitment to provide the best
customer service in the industry.
France’s largest pharmaceutical company Sanofi has an official consultant office in Yerevan, headed by Vasily Stepanyan, who acts
because the company’s local representative and negotiates with the
Armenian Ministry of Well Being directly on behalf of the company.
Sanofi actively participates in state tenders for the provision of significant medicines, particularly insulin. The firm cooperates directly with
the Armenian Ministry of Health, supplying drugs without intermediaries.
“Whathappens when you probably can’t pay? You are now a distributor because you should payoff the debt. Subsequent thing you realize these kids are selling to theirbuddies.” Jack continued tocheck on Hooton every different
month, and over the subsequent year and a half,
afriendship developed. Jack listened as Don talked
concerning the Taylor HootonFoundation, which he had
formed in an effort to teach kids and oldsters aboutsteroid use.
The probe had stalled, despite the fact that police had identified
a localteenager they imagine had equipped Taylor with steroids.
Don was also upsetwith officials at Plano West
Senior High; he felt they weren’t acknowledgingthe steroid problem on the college (box, web
page 74). DEA brokers andinformants communicated with sellers utilizing BlackBerrys,
and the e-mails wererouted to an FBI Regional Pc Forensics Laboratory to
be indexed asevidence.
There shall be roughly 310,720 new cases of invasive breast most cancers detected in females.
There will be roughly fifty six,500 new diagnoses of ductal carcinoma in situ (DCIS).
Moreover, the anabolic steroids market progress price on this area will also be accelerated by the
increasing presence of significant key gamers and the elevated use of innovative applied sciences.
In Germany, the steroids market is influenced by the country’s sturdy sports tradition, increasing healthcare expenditure, and rising interest in health
and bodybuilding. As more Germans engage in fitness actions
and aggressive sports, there’s a rising demand for steroids to boost efficiency and muscle mass.
The use of corticosteroids in Germany for the treatment of inflammatory diseases such as
arthritis, bronchial asthma, and autoimmune issues additionally drives the medical phase of the market.
The German government’s stringent laws on steroid use and distribution are pushing the market in the
direction of safer, regulated products.
Aggressive pricing brings out our efficacy in opening the best steroid alternatives; Kai, opportunities for distributors excited about advertising steroids
in their respective regions. Our hormone medicine are priced to swimsuit endocrinologists in the most effective method attainable.
Evolving as hormone manufacturers rose out of our ardour to serve
the world with higher high quality of life. This is why we are
headed in path of making our presence stronger within the hormone manufacturing trade all across the globe.
We have seen people respond very nicely to authorized steroids or steroid alternate options, during which case they do experience steroid-like outcomes.
For finest outcomes, it ought to be stacked with other legal steroids, as results are minimal with HGH-only
cycles in our expertise. HGH is a protein hormone that is naturally secreted by the pituitary gland.
The region’s rising level of disposable revenue is the rationale behind the expansion of the anabolic steroid business there.
Additionally, the expansion of the healthcare sector and the growing variety
of generic medication manufacturers will accelerate the growth fee of this business.
In 2018, greater than 90% of the Indian pharmaceutical trade was
made up of generic medications.
In the following months, all eight corporations either halted orsignificantly
cut back on the production of steroids, and seizures of Mexicansteroids smuggled into
the united states dropped significantly. The DEA set up awebsite of its own, bio-power-meds.com, purportedly backed by a distributorflush with cash and ready to function a
conduit to prospects in the states.Informants also posed as distributors
seeking to purchase giant portions ofsteroids. Websites similar to anabolicsclub.com and mexicansteroidsales.com allegedlysold steroids to the feds from Saltiel-Cohen’s three companies,
Animal Energy,Denkall and High Quality Vet, and shipped them to
P.O. Inall, agents seized or tracked some 360,000 doses of anabolic steroids.
The Internet hasfueled the growth of the steroid enterprise, enabling
anyone, including youngsters, toorder the
medication from residence. In Accordance to Doug Coleman, a
DEA supervisory special agent withexpertise in steroid circumstances,
some dealers “troll the Internet likepedophiles. They stake out bodybuilding chat rooms and dialogue boards usedby kids seeking to get stronger.” Just
previous to the ban on steroids within the Olympics,
the German Democratic Republic (GDR) began a program with the targets
of synthesizing new anabolic steroids for
their athletes to use in varied sports activities.
For many people, life would be unimaginable without medicines containing steroids.
Corticosteroids, the commonest steroid group, are used to
treat arthritis; asthma; autoimmune diseases corresponding to lupus, Crohn’s illness and a quantity of sclerosis; pores and skin circumstances; and sure
kinds of most cancers. Some steroids are available today
as over-the-counter remedies for minor irritations corresponding to mosquito bites; other steroids are literally life-saving prescription medicines.
Implementing the program was the Plano district’sresponse
to a rash of steroid scandals at North Dallas
schools. After TaylorHooton, a baseball participant at Plano West Senior, committed suicide in 2003
afterusing an anabolic steroid, athletes from his school and Plano Senior Highadmitted that other athletes were additionally doping.
Some 35 miles to the west, nineplayers from Colleyville Heritage High confessed throughout a
college investigationthat they’d used steroids.
“One new product came out final week,” says Velàzquez, thefarmàcia
owner, “however it seems like a unhealthy imitation. It seems prefer it wascooked up in somebody’s home.”
But it won’t be on the level you can obtain via external use.
Anti-aging is one other space where HGH can have some highly effective advantages, and
it is doubtless considered one of the causes many people will choose to use HGH no
matter whether they are bodybuilders or athletes or not.
Although Anavar could presumably be categorized among prime
tier steroids in the market at present as a outcome of its quite
a few advantages to health fanatics, shopping for it ought to be accomplished with utmost care.
While virtually at all times found as an oral tablet, Dianabol could be
discovered as an injectable solution, but the tablets characterize the primary route of administration. In many ways it gave start to the age of contemporary
efficiency enhancement. It was not the primary anabolic steroid used
for that purpose, that might belong to testosterone, however Dianabol would open the door to a
model new wave of steroid use that has grown past what anyone anticipated.
Men who use anabolic steroids are sometimes involved with increased aggression and mood changes as a
aspect impact, however HGH works in a unique way from testosterone.
HGH itself can help enhance mental well-being and temper when used at sensible doses.
Nonetheless, its complete toxicity should not lead to liver harm
if responsible use is followed and the liver was wholesome
to start with. During use, liver enzyme values will enhance,
but it’s necessary to recollect will increase in values does not equate to
damage but somewhat stress and potential
injury. In order to avoid harm, use must be limited to 6 weeks of
total use.
Anavar’s recognition is underscored by the ability
for people to legally purchase the product on-line with no prescription from respected sources.
Then we’re left with the chopping cycle, and you will not discover Dianabol
in such plans too often. Some competitive bodybuilders will use
it early on in a slicing section in order to keep fullness, and it will provide lean tissue safety; nevertheless, there
are higher choices. One drawback with slicing cycle use can be the level of water
retention this steroid can provide, which is normally the very last thing you need when cutting.
Such retention can be managed, and the flexibility for this
steroid to take care of energy can be appreciated, but there
are higher choices. The effects of Dianabol can be summed
up as fast appearing and dramatic. In reality, it’s more than possible for
the person to realize as much as 20lbs of mass in just a few weeks of Dianabol use.
Fortunately the virilization rating of Anavar is extremely
low; most girls can supplement without falling to such results so lengthy as they supplement responsibly.
There will at all times be the difficulty of individual response to cope with, but the Oxandrolone hormone continues to represent the most secure anabolic
steroid for female use. If virilization signs do happen for any reason, you are inspired
to discontinue use instantly and they will fade away.
HGH is generally thought of much less dangerous than most anabolic steroids,
with less likelihood of extreme unwanted effects.
This solely applies to sensible use of HGH, although, including moderate doses and not
using HGH constantly over intervals of years – as this
is the place very critical health impacts can come along.
As I typically like to repeat, HGH works superbly in synergy
with nearly any anabolic steroid.
This publish is about buying steroids on-line, however from a steroid retailer point
of view. The aim is that can assist you, the customer, in understanding the
market and keep away from unpleasant experience.
As in any other market, there are good and dangerous gamers and
the dangerous apples spoil everyone else. While buying steroids online offers convenience, it is crucial to remember of the danger
of counterfeit products. Purchasing with Domestic Provide
minimizes these dangers, as we are committed to offering only real,
high-quality steroids to our customers. In the United States, steroids are classified
as controlled substances. Legal steroids discuss with FDA-approved substances prescribed for
specific medical situations.
Sustaining this measured intake over 8-10 weeks strategically initiates the cutting process, decreasing physique fats whereas preserving lean muscle mass for a sculpted physique.
Regardless of its complete degree of power, which all will agree is
high, Dianabol’s place in the historical past of anabolic steroids is an important one.
Athletes have always strived to be one of the best, and enhancing performance has at all times been a
pursuit. Injecting testicular extract to eating uncooked animal testicles themselves have all been part of sports activities; the latter since sports existed.
Nevertheless, it would be Dianabol that might bring forth
the fashionable age of performance enhancement and the
conclusion of what anabolic steroid use may do in a performance capacity.
For nearly all of the inhabitants, you will want a prescription,
for the the rest of you, you’ll merely want to purchase them
from the pharmacy prescription or not, and from there it’s no matter you need.
If you finish up in Mexico or one of the different similar countries, it’s not authorized or illegal to possess steroids; there is not a regulation either
means just as there’s no legislation concerning the
air you breath. Our Steroid Warehouse is based within the Usa, making
certain quicker domestic shipping. Orders that embody only Genli Pharma merchandise are shipped from this
warehouse within 3-5 days. Geno Pharma Domestic Steroids Warehouse 2 supplies exceptionally fast shipping throughout Canada
and the USA. Receive your orders in just 1-2 days within Canada and only 1-3 days across the USA.
Our specialised steroid warehouse is exclusively dedicated to managing
and dispatching Geno Pharma products, making certain your buy is
handled with precision and velocity.
This complete guide will empower you with knowledge on the place to purchase anabolic steroids safely and effectively, emphasizing high quality,
trust, and your private health objectives. In some nations,
Anavar could additionally be available for buy at local pharmacies.
Nonetheless, it’s essential to notice that the regulations surrounding the sale
of anabolic steroids can range between nations.
In certain regions, a prescription may be required to buy Anavar from a pharmacy.
HGH is probably the most costly compound to purchase, and
the fact that you should use it for months on finish to get respectable results adds to that cost.
It can simply set you again many 1000’s of dollars to a 4-6 month HGH cycle.
Its major objective (as you’d expect from its name) is to promote progress.
HGH has a number of medical uses, and more potential makes
use of are being researched on a regular basis,
starting from the therapy of debilitating circumstances right by way of to more
therapeutic and anti-aging purposes. I know
I can search the dark web, however as somebody who has
never visited the dark internet, how are you going to make sure
you don’t get scammed. I assume when you buy one thing, you would possibly be shopping for one thing on-line
together with your credit card. I work out at my home gym so I don’t have connections with
anybody at an enormous globo fitness center.
References:
0Ahukewidnn3Tqnnnahusgk0Khuthadwq4Dudcas|Hormone Cortisone Function (https://Slavasnowshow.Com)
Tren-Max offers a safe and efficient way to enhance your efficiency and
physique without compromising your health. Muscle building could be an exhaustive activity that will have an effect on your well being.
It helps in muscle restoration and lowers the prospect of any muscle injury.
Always be proud of the way you seem by rigorously contemplating the options you select.
This article has clarified lots of issues about authorized steroids and the bodybuilding complement brands that have
been discovered to be good. Steroids used for bodybuilding are illegal and
might need opposed results.
However since ladies might wish to take a smaller dose than men, that becomes difficult or impossible to do.
We specifically selected Loopy Bulk supplements
for our beneficial listing because they make adjusting the dose very easily.
This seems to be all the method down to an excellent dose of L-Citrulline,
which can have a constructive impression on blood move and power provide to muscular tissues [4].
Decaduro is one other great possibility if you want to obtain a extra defined muscle tone.
Their choice may also relate to which one
is the best to obtain on the time. This is the all-important factor to bear in mind, but it
in the end requires testing a product to ensure it does
what the advertising material says. These serious issues from feminine steroid
use are huge reasons to go for safer options. We considered person feedback and our own testing experiences,
noting any symptoms like nausea or upset abdomen. All possible measures have
been taken to ensure accuracy, reliability,
timeliness and authenticity of the information; nonetheless Onlymyhealth.com does not take any liability for a similar.
Utilizing any information offered by the internet site is solely on the viewers’
discretion. Remember to all the time search medical recommendation out of your skilled healthcare supplier before including to your
routine.
Customers have skilled each a reduction in body fats and an improvement
within the energy of their muscles. BCAAs and 20-hydroxyecdysone both stimulate protein synthesis
and vitality era. Whey protein boosts total-body anabolism
and promotes speedier muscle recovery. Thousands of satisfied users suggest Tren-Max for its capability to reinforce energy,
endurance, and restoration, allowing you to dominate every workout.
There aren’t any unwanted aspect effects to point out up, but don’t take this supplement if you have pre-existing symptoms
or diseases. So, if you would like to enhance your train performance and obtain your bodybuilding targets, legal steroids are positively price
considering. We evaluated the overall value of each authorized steroid, contemplating its
effectiveness, safety, formulation transparency, producer popularity, and worth.
The supplement accommodates important minerals
and fat-burning brokers that help promote weight loss and scale back the volume of fatty tissue.
To ensure that the authorized steroids we suggest are
efficient for weight reduction, we evaluated the scientific proof supporting every ingredient.
Common use of Tribulus Terrestris can boost intercourse drive and erections in males.
Its natural components, like Ashwagandha, MSM, Tribulus Terrestris, and essential
vitamins like Vitamin D3, contribute to post-workout recovery.
D-Bal MAX is a natural dietary complement that will assist you to get essentially the
most out of your workout. Its one-of-a-kind formula is
not like anything on the market, and it delivers most effects within the shortest time possible.
We looked at how a lot of every ingredient was used to ensure it’s secure
and efficient for skinny guys.
To maximize features during bulking, stack Tren with Dianabol, DecaDurabolin, and Sustanon (testosterone).
A cycle of Tren is an excellent selection for any man who desires
to get the utmost improvements in muscle mass
within the shortest space of time. Trenbolone can increase muscle progress by increasing dihydrotestosterone (DHT).
Whether you’re seeking to bulk up, minimize down, or improve general performance, Tren-Max delivers spectacular advantages that cater to your bulking or chopping targets.
This unbeatable mixture helps cut back fatigue, enhance vitality ranges,
and support muscle building. Anvarol is simple to incorporate into your health routine, with just three capsules to be
taken within 15 minutes post-exercise. The handiest approach to construct muscle is by combining a nutritious diet with
consistent train and supplementation. This might help to
maximize muscle growth while additionally selling overall well being and wellness.
The manufacturers talked about on this article are trusted and utilized by fitness fanatics and professional bodybuilders.
Following a balanced food plan and utilizing authorized steroid options and dietary supplements may help you obtain your desired lean muscle and health objectives safely and
effectively. They’re produced from plant extracts, amino acids,
and nutritional vitamins that mimic the effects of steroids (like muscle progress
and fats loss) with out the dangerous unwanted effects
or authorized dangers. Trenorol has a plethora of substances that enhance both strength
and endurance, therefore boosting exercise efficiency.
When mixed with a healthy diet and common train, this non-steroidal different to anabolic Steroids for beginners
steroids makes it simpler to get the physique
and degree of health you have always wished. For optimum results, consume three capsules
together with water for forty-five minutes before beginning your
train. Tren is a robust anabolic steroid identified for its capability to advertise speedy muscle progress, fats loss,
and elevated power.
In the vast realm of hormones, testosterone stands out, not only for its role
in growing male traits but for the silent, crucial roles it performs in our general well being.
Whether you’re a person or a girl, understanding the significance
of this hormone and knowing tips on how to keep optimum ranges can go a great distance in making
certain a wholesome, vibrant life. Beyond bodybuilding
or athletic purposes, steroids have discovered a place in drugs.
Some of them, although, have little or no research proof
to support their inclusion. In checking out one of the
best from the remaining, we focused only on testosterone booster dietary supplements
that solely contained research-supported components. If you are allergic to any of the ingredients in testosterone boosters, you
ought to not take that product. This underscores the importance of checking the elements before you buy testosterone
booster dietary supplements. Prime Male is a natural herb-based testosterone
supplement that is marketed toward men over the
age of 30.
Nevertheless, long-acting AAS similar to nandrolone may
be detected for no less than 6 months (Bagchus et al,
2005). By distinction, the urinary metabolites of exogenous and
endogenous testosterone are virtually identical. Furthermore, testosterone
is each comparatively inexpensive and available (Summers,
2002).
Apply this patch by pushing it against your gums and to the left or proper of your
front enamel. Keep it in place by pushing on it from the surface of your mouth as well.
The patch repeatedly releases testosterone
into the blood via the oral tissues. Substitute
it after 12 hours, switching to the other facet of your mouth.
Testosterone is absorbed directly by way of the skin when you
apply the clear gel once a day. You usually rub this in your shoulders, upper arms,
or thighs, relying on the instructions on the treatment.
DMAA has been found in numerous muscle-building and weight reduction dietary
supplements, however it’s not protected. Any product that contains it and
markets itself as a dietary complement is against the law.
Throughout puberty, hormones, including testosterone, play a crucial
role within the growth of secondary sexual characteristics,
together with penis progress. Testosterone is a
hormone produced by the testes and is answerable for male
characteristics similar to muscle growth and deepening of the
voice.
Let’s take a better take a glance at each prohormones and testosterone boosters.
In conclusion, legal testosterone Synthetic Steroids For Sale can supply substantial benefits for individuals
looking for faster recovery times and improved efficiency during their workouts.
By incorporating these dietary supplements into their
routines, athletes and fitness enthusiasts can more effectively recuperate from the stresses of
coaching whereas preserving and growing muscle mass.
“Anabolic” steroids are recognized to supply quicker outcomes, however
they arrive with serious and doubtlessly life-threatening side
effects corresponding to liver harm, heart illness, and temper changes.
However, there are safe, authorized steroid choices to
consider, similar to Crazy Bulk. This makes using steroids a much less dangerous possibility for many bodybuilders and lets
you avoid any danger. These authorized steroid options may fit over
an extended length of time, but they do not breakdown your physique’s natural processes or
cause severe irritation of any organ tissue.
It can be highly effective for men with a decreased libido and low intercourse drive.
Authorized steroids are fitness dietary supplements designed to help in achieving health targets, corresponding
to muscle acquire, fat loss, and improved athletic performance.
Not Like anabolic steroids, authorized steroids contain natural components
and are thought-about protected for use.
Many people assume these substances are one and the same,
but that’s not true. AAS have been on the Worldwide Olympic Committee (IOC) Medical Fee banned substances record since 1974.
That signifies that they are not allowed underneath any circumstances in competitive sport.
バイナリー取引は、シンプルで、誰でも始めやすい資産運用手段のひとつです。相場が一定時間後に上昇するか下落するかを予想するだけで、アプリひとつで取引できるのが魅力です。私も最近始めてみましたが、とても手軽で楽しいです。短時間で結果が出るので、空き時間やスキマ時間に遊び感覚で挑戦できます。損失の可能性もありますが、当たったときの達成感は格別です。少しでも気になるなら、まずデモ取引で試してみるのがおすすめです。 https://yutosato1.hatenablog.com/entry/2025/06/02/223300?_gl=1%2A6t9z20%2A_gcl_au%2AOTI3NDA4NjkxLjE3NDg0MjA4ODY.
Still, Primobolan comes with the profit of not posing a danger to the
liver, as there are not any recognized instances of liver hepatotoxicity reported for this steroid.
Nevertheless, since most people will stack Primobolan with other steroids that
may themselves trigger hepatotoxicity, it’s important to pay attention to the risks
to the liver of each compound you’re taking. Nonetheless,
Primobolan has a slightly totally different chemical
structure from most oral steroids, so it has a a lot lower threat of hepatotoxicity.
This doesn’t mean there is zero threat of the liver being affected, though, but decrease
doses of oral Primobolan are safer than most different oral steroids.
Unknown Long-Term Results – Since human research on ACE-031 are
limited, the full scope of potential risks stays unsure.
Swelling in Limbs – Some customers report fluid retention and swelling, notably
in the legs and arms. Improved Endurance and Fat Reduction – Customers may expertise enhanced endurance and decreased fat accumulation, which contributes to
total body composition enhancements. Most customers had an overall great experience with this
supply, especially with security protocols. Osgear offers a seamless online purchasing expertise, providing a various vary of high-quality
AAS steroid products that cater to numerous buyer wants. I’ve placed a
quantity of orders now and every single one has come through with out issues.
Most importantly, know what you need along with your physique earlier than dashing
to any cycle. Additionally, it is advisable to do hard
steroids for shorter periods to attenuate their side effects.
Overall, injectable cycles are extremely beneficial to newbies because they yield fast outcomes.
You additionally get to familiarize yourself with the prominent steroids and become tolerant of their use.
Testosterone is the very first thing that should
come to your mind if you want to start a steroid cycle.
Most beginner bodybuilders choose utilizing cypionate and esters in their first cycle.
Importantly, the concept of steroid cycles extends past mere dosage and length, taking into consideration post-cycle therapy (PCT).
PCT includes the use of medications or supplements to help the physique get well its natural
hormone production after the steroid cycle concludes. This is essential in preventing the suppression of the body’s endogenous testosterone manufacturing
and mitigating potential hormonal imbalances.
Low-dose medical studies present a very clear unfavorable impact on cholesterol with alarming changes to the LDL/HDL ratio[2].
So, we can only think about what greater doses can do to
our cholesterol levels. There’s no way round the
truth that Winstrol goes to suppress your
natural testosterone manufacturing. It is named one of the more suppressive steroids, although
not the worst by any means. Androgenic unwanted effects are possible with Winstrol, but these will impact
everyone in a different way.
One study found that over 40% of steroid customers experienced acne, significantly on the face and again. The excellent news is that zits
can disappear when you cease the steroid; however, baldness is extra permanent.
Some steroids can improve the feminine hormone
estrogen by bringing about an imbalance in hormones
that leads to the aromatase enzyme changing an extreme quantity of testosterone into estrogen, causing distressing unwanted side effects.
This can take a while to develop, and women must be prepared to attend round
five weeks to start seeing noticeable physique benefits. Operating a 10-week cycle is a reasonable aim for females, with doses as
much as 50mg per week. Primo will usually be added to a cruise or TRT to maintain a fit look with no
unwanted aspect effects in between blasting or regular steroid cycles.
Somewhat than leaping into advanced cycles,
take the time to achieve an in-depth understanding
of newbie and intermediate cycles and more research
about steroids and tips on how do anabolic steroids affect the body to
get the most from them. You can undergo a stasis interval after the cycle, which is sort of a ready period
and lasts about four to six weeks. So put aside that urge to make use
of Winstrol, Deca, Tren, or the rest on the
first cycle and save them for future cycles, including simply one at a time to see how you reply to each!
Staying on a low dose can result in plateaus; nevertheless, by rising the dose and size of the cycle, customers
can proceed including muscle and strength. 10 pounds of further lean muscle could be gained because of
this follow-up cycle. This before-and-after transformation is typical of a bodybuilder’s
outcomes after taking a low-dose testosterone cycle for the primary time.
Users will lose fat and gain significant quantities of muscle, typically up to 20 pounds.
I additionally get why some athletes argue that steroids level the
playing area or help them recover faster from grueling workouts.
I assume prioritizing short-term features over long-term
well being is a gamble that can have irreversible consequences.
There are safer, confirmed methods to maximize performance
with out endangering your well-being. In this text, we evaluation, critique, and broaden on Dr.
Mike Israetel’s latest podcast dialogue about steroid use.
Their position in controlling most cancers pain and other indications in the midst of cancer and some sensible elements of steroid use shall
be mentioned on this article. In Accordance to the WHO and EAPC ache administration suggestions, an adjuvant
ache medicine ought to be thought of at every step of the WHO analgesic ladder, especially when the anti-inflammatory impact
is needed. Evaluation was restricted to sufferers who have been recognized with the condition at/before the index orthopaedic go
to, as recorded by the Clalit Health Companies persistent illness register.
If you have problems with unwanted effects, they don’t go away, or they become worse, talk with
your doctor or pharmacist. They can focus on options for managing unwanted
effects or other available remedy choices.
Steroid injections into your heel relieve ache for about a month and
likewise considerably cut back inflammation. TRT is only protected
for individuals with clinically low testosterone levels. Addressing the sensitive subject of
libido and fertility, Dr. Israetel debunks myths while acknowledging potential unwanted side effects.
He explains that whereas steroid use doesn’t have an result on penis dimension, it could
result in testicular shrinkage in about half the customers.
Present analysis suggests such herbs and amino acids exhibit constructive results on testosterone levels (7); nevertheless, they’re unlikely to trigger exceptional elevations.
SARMs work by binding to the androgen receptor and thus growing testosterone levels, but they possess
unique tissue selectivity. Thus, in principle,
if a complement might considerably improve testosterone ranges
to the same diploma as steroids, it would additionally
mimic their results. Consequently, a big variety of weightlifters are seeking a
substance that can replicate the anabolic effects
of steroids however with a less severe aspect impact.
Patients present process testosterone therapy must be regularly monitored to judge their response to therapy and to identify any potential opposed results.
This monitoring ought to occur at 3 to six months after starting remedy after which annually,
with specific attention given to cardiac opposed occasions.
Regular follow-up and analysis are crucial to make sure the safety and efficacy of testosterone remedy.
Steroids’ anabolism is rooted of their ability to dramatically improve protein synthesis and nitrogen retention contained in the muscle cells.
The potencies of corticosteroids vary widely, with synthetic compounds usually retaining higher antiinflammatory efficiency and weaker
salt-retaining properties; these potencies are summarized in the Table.
Practitioners should be aware that these medicine would possibly exacerbate
a preexisting situation or present a brand new medical condition.
To present an evidence-based review of seven commonly used pharmacological interventions for efficiency enhancement in athletes.
Most of the common unwanted effects aren’t too extreme to outweigh the benefits.
Some corresponding to deepened voice and increased facial hair might even be desired.
This is the male intercourse hormone that’s normally produced in the Leydig cells within the testicles.
As with any steroid, it’s necessary to compare Primobolan with
different anabolic steroids to grasp its distinctive characteristics and advantages.
The following comparative desk highlights key elements of Primobolan compared to other in style anabolic steroids.
Long-term use may cause the body to provide too many
purple blood cells and irregular levels of fat (lipids) within the
blood. Low-density lipoprotein (LDL)—the bad—cholesterol
levels enhance, and high-density lipoprotein (HDL)—the
good—cholesterol levels decrease. Severe cardiovascular issues, including
high blood pressure,heart attack, and blood clots, are reported with the usage
of anabolic steroids.
The medicine what Does A steroid do; bamchrc.co.In, enter the bloodstream, however you probably won’t discover any unwanted
effects from it. TRT is designed for individuals with
low testosterone levels because of medical reasons.
It’s not meant for those seeking to reinforce their efficiency or
physique. Corticosteroids are commonly prescribed in most cancers
sufferers for quite a lot of signs [24, 25].
There is evidence for the use of corticosteroids for particular indications similar to raised intracranial strain, spinal twine compression, superior vena cava obstruction, and bowel obstruction. The beneficial dosing
of corticosteroids in different clinical situations is introduced in Desk 4.
Many of the products fail to significantly increase serum testosterone levels,
together with eurycoma longifolia – an natural extract commonly
marketed to spice up testosterone.
Nonetheless, while effective in all of those areas the place it has
stood out closely is in the remedy of osteoporosis.
Nandrolone is primarily prescribed for HIV patients and with a high stage of success.
It has additionally slowly grown in use among anti-aging sufferers
who endure therapeutic rejuvenation plans. Progress hormone (GH) – this is a naturally occurring hormone that causes the body to grow
however is also used by athletes as an anabolic agent to extend muscle progress.
There are a quantity of types of steroids, every with its
personal set of uses, dangers, and legal considerations.
In this text, we’ll explore the different varieties of steroids and their various applications.
Corticosteroids have a broad range of medical makes use of and are prescribed by healthcare professionals to manage
varied inflammatory and autoimmune conditions.
In Accordance to the World Health Group, corticosteroids are important
medicines that can be life-saving when used appropriately.
Nevertheless, misuse or overuse of corticosteroids can result in serious unwanted aspect
effects, such as osteoporosis, diabetes, and cardiovascular disease.
Fortunately there are methods to extend testosterone naturally.
They didn’t have the detailed understanding
of science at present, but they have been dedicated and
put within the work. He had great mixture of
muscle measurement and tone throughout most of his body.
A physique like that’s definitely attainable
naturally by most men. Low testosterone and calorie restriction stifle muscular progress.
But you’ll find a way to acquire muscle and become stronger and extra “minimize”
should you hit the weights onerous enough, Barnes says.
He recommends that novices start out by doing
one to 2 sets of energy exercises that target all major muscle groups, thrice every week.
As you build strength, you can enhance the workload.
After a number of months, for example, you would start
coaching four days a week and steadily growing your
units to three to five, he says. Nor do you must fuss about
hitting precisely zero.73 grams per pound of body weight, or creating a big buffer above it.
It’s an upper certain past which advantages are probably to plateau, not a minimal.
They lived in a time before artificial elements, preservatives and pesticides bastardized meals like today.
They all lifted weights from the bottom up (think deadlifts, and clean and presses).
All of them had thick thighs and large calves consequently.
To know how massive you will get naturally we have to look to historical
past throughout a time earlier than steroids for cutting fat; Lorena,.
Trendy expertise offers you ways to enhance your
health with out doing workouts and taking half in sports. Whole-body vibration, for instance, can provide many therapeutic benefits with little
injury threat. This treatment empowers fragile sufferers who can’t get to
a recreation center. A 2018 article in BMC Geriatrics looked on the results of vibration remedy on muscle mass in institutionalized adults.
Each of them was knowledgeable strongman or a
wrestler. They have been all robust as an ox and routinely bent steel bars and hoisted large amount of weight
from the bottom. Sandow isn’t big by any means however he has a chiseled physique and appears like
a lean athlete. To prove it, here are three examples of men who were of their prime earlier than steroids hit
the scene. This article additionally serves as a reference point when analyzing
if somebody is natural or not.
It’s not at all times glamorous, however it’s rattling genuine.
When you hit a plateau, it’s not a sign to give up; it’s an indication to adapt.
Change up your routine, tweak your food regimen,
and push by way of. Breakthroughs occur when you refuse
to just accept mediocrity. Now, let’s address the elephant in the
room—plateaus. They’re like that stubborn friend who won’t take a touch and leave the party.
Plateaus are part of the game, and they’re the
place most people throw in the towel.
Jail meals is enough to maintain a person strong and healthy.
But it isn’t designed to construct muscle and get you bigger.
Some extra gadgets are available through commissary systems in some prisons but it’s sometimes not
one of the best food regimen – just better than normal. It will at all times be available and
requires little or no tools for primary power training.
If you’re willing to pay the worth, you’ll be rewarded with a
stronger, leaner, and more muscular body. Trying to bulk up before they’re
lean sufficient to make the most effective use of the additional
energy they’re going to be taking in. As a gross generality,
males ought to goal to be about 12% physique fat whereas ladies must be between 17-21%
body fat. A good indicator you are heading in the
best direction is having some abdominal definition earlier than attempting to bulk.
A pre-workout meal ought to be consumed between ninety and a
hundred and eighty minutes earlier than lifting weights, and a post-workout meal ought
to be consumed between 60 and ninety minutes after your exercise.
A lunch that’s excessive in carbohydrates, protein, and fats
can be something I advise. Protein must be ingested
throughout the day as evenly as possible, and carbs should mostly be consumed before exercise
and right earlier than mattress. Unleash the total testosterone-producing potential in your
body. Many natural lifters are already on the verge of overtraining
and after they finally do cut back, that’s when they see the most effective outcomes.
If you aren’t getting any positive aspects and you
know your calorie intake is where it must be, likelihood is,
you’re training an excessive quantity of.
Your coaching program is the horse you’ll ride into
battle against the chemically driven beasts.
Your training ought to be ruthless, intense, and unforgiving.
However above all else, it should have the best quantity of quantity in order to not overstimulate your CNS system but also
to drive muscle protein synthesis. It’s meant to let you know that you shouldn’t have
unreasonable expectations from training. You can use proper nutrition,
the most effective isolation exercises, and bulking section after bulking phase, and you’ll nonetheless be limited by your genetic potential.
If you’re a guy, as soon as you’ve added about 20 pounds of muscle and lowered your body fats to about 10%, you’re going
to look incredible.
Individuals who have by no means used clenbuterol before are extra doubtless to have opposed results than those who have.
Please continue the food plan and dietary supplements until a minimal of six weeks into it.
A couple of cheat meals won’t kill you, but in the first six weeks, we want to be as strict as attainable,
especially the primary two weeks. I’m married with two youngsters at the home and junk meals in all places, and
I can do it, SO CAN YOU. By the time your preliminary six weeks have passed, you won’t consider the changes you’ve already made
without steroids.
Timing your clenbuterol dose is crucial as a outcome of its half-life (about
36 hours) and stimulant effects affect how your body responds.
Taking it on the mistaken time can disrupt sleep, scale back effectiveness,
or amplify unwanted effects like jitters.
Done proper, correct timing maximizes fat burning, performance,
and security. Discover our clenbuterol products at USA Elite Steroid for top anabolic steroids
(http://Www.cbtrends.com)-quality choices to fuel your transformation. Clenbuterol is a powerhouse compound for bodybuilders and health enthusiasts, famend for its capability to burn fat, improve efficiency, and sculpt a lean, chiseled physique.
But to unlock its full potential, knowing when to take clenbuterol is just as
essential as understanding how much to take.
A easy alteration of testosterone leads to deca, a comparatively more anabolic
and fewer androgenic steroid than testosterone.
Deca Durabolin is the Nandrolone hormone with the Decanoate ester
hooked up to it. If you don’t have a few thousand dollars
to spend, then most likely not.
In Accordance to the Journal of Medical Toxicology, Clenbuterol increases protein synthesis,
leading to hypertrophy. At the identical time, it promotes fats breakdown through adipocyte β3-adrenoreceptors and
causes your body to break down fatty acids. Current
evidence confirms that Clen is an efficient fat burner and will enhance athletic efficiency.
Furthermore, medical proof confirms its fat-burning results, which appear to be higher than those of
yohimbe and ephedrine.
In our expertise, combining trenbolone with different anabolic steroids in a
stack has resulted in additional well being deterioration. A Level 1 Equipoise cycle
for slicing will symbolize a superb plan for preserving lean mass.
With the addition of Anavar on the end, as soon as lean the individual will also find he’s a
lot more durable and much more defined. Although not listed in the plan, this is a
wonderful time to suppose about thermogenics like Clenbuterol and/or thyroid hormones like Cytomel (T3).
Regardless of your expertise with anabolic steroids, most
any wholesome adult man will be capable of implement this Equipoise cycle.
It might additionally prove very helpful for the aim of athletic
enhancement.
Observe, however, that clinical research by no means followed up on this potential because of the dangers
of clenbuterol [42, 43, 44, 45]. A examine in rats suggests that the impact of clenbuterol is muscle-specific with fast-twitch muscle tissue growing more
quickly and degrading less. Fast-twitch muscles are utilized in highly effective,
fast bursts of activity [41]. Though, clenbuterol did not enhance protein manufacturing in one research in rats.
In addition, various doses of clenbuterol have been administered to 12
children with severe bronchial asthma.
However, we didn’t observe an impact of CLEN at concentrations 1.0 and 1.6 ng/mL.
Curiously, we detected a statistical distinction in T cell proliferation between cells treated with CLEN at zero.6, 1.0, and 1.6 ng/mL (Figure 1A–D).
A vital difference between totally different CLEN concentrations additionally arose for CD4+ and CD8+.
In the case of WT horses, a special development in CLEN activity was
observed.
In Contrast To another steroids, Anavar doesn’t trigger significant water
retention, which suggests you’ll look dry and defined quite than bloated.
From the keto diet to pure fat burners, there are safer ways
to get lean and maintain the pounds off. A high-protein diet, just like the paleo food
regimen, can help you construct mass and torch fat.
Or you can begin tracking your macros and cut calories to
get in shape. Some athletes increase the dosage steadily until
the final day of the cycle. One Other possibility is to take a small quantity daily,
such as 40 micrograms, for 16 weeks or extra.
It’s essential to realize that even when the above effects fade
away, Clenbuterol’s fat-burning capacity caused by an enhanced metabolism remains to be happening.
When the dosage has reached its highest stage at 140mcg, the
cycle is stopped. Importantly, when starting your cycle once more, the
dosage does not start on the low stage but as an alternative at what you completed the earlier cycle at;
in this case, 140mcg. This dosage is maintained all through the whole
second cycle for two weeks. Many guys who often take a look at their resting heart price find a significant rise – generally 30 bpm or
more than traditional. This is Clen’s stimulant effects
kicking in and its thermogenesis and metabolism-raising exercise.
This stack must be an 8-week cycle; ideally, you will
increase your dose as you go. Start with daily doses of 10mg of YK-11, 10mg
of Ligandrol, and 10mg of S23 for the first four weeks.
Then, modify your dosage as you’re snug, including 5-10mg
to each compound for the relaxation of the cycle.
This isn’t a problem for feminine customers, however there
are different possible unwanted side effects of women taking steroids
effects you need to be able to deal with as a feminine SARMs
person. Complications are a standard minor side effect for many people utilizing SARMs, especially within the early stage of a cycle as your physique adjusts.
Common painkillers might help however typically aren’t really helpful to be taken whereas utilizing SARMs.
Suppose features associated to hormones, ldl cholesterol, cardiovascular,
liver, kidneys, blood rely, and other values change considerably.
In that case, you’ll wish to modify your SARM cycles accordingly (or even cease utilizing
them altogether, in extreme cases). You would possibly assume you feel nice, but you should have no method of understanding what results SARMs have
over the long run. An 8-week cycle is sufficient
for attaining glorious fats loss outcomes, with a toned, defined, and muscular
physique achievable over these two months.
Every Little Thing you want for a successful cutting cycle – add diet and exercise, and also you won’t struggle to get
glorious outcomes with this stack. To take issues even additional, another advanced slicing
cycle consists of the addition of YK-11 alongside S-23. In this cycle, S-23 could be
run for eight weeks at 20mg, whereas YK-11 is
added to weeks 5-8 at 10mg every day. The identical SERM protocol as the S23-only
cycle above ought to be enough for testosterone help. The addition of YK-11 promotes a
fair drier look and is a cycle for the more advanced user because of increased suppression.
Your training effort and food plan will determine how much you gain, but you can simply
aim for 10-15lbs and even more. If you want to shred fats while gaining muscle,
Ostarine gets the body to burn fats efficiently, and
you will discover that you’re sustaining excellent muscle strength even whereas dropping fats.
S-23 adds even more to the hardening and drying results, and
that’s the principle advantage of its addition to this stack.
Ligandrol offers an extra punch to your muscle
gains, a strength enhance, and assist for tendons and
ligaments. YK-11 has large advantages for bulking cycles, and when used
at low to reasonable doses, the unwanted effects ought to be manageable for
most customers. It isn’t generally thought of the best SARM to start with for many who are new to SARMs since it’s steroidal.
This can persist for the first few weeks of a cycle, and then sleep patterns usually enhance.
The main purpose of post-cycle therapy is to restart
endogenous testosterone production. This aids in normalizing hormone
levels for optimal physiological and psychological health, in addition to retaining results from a cycle.
In Thailand, the regulation states that Anavar should not be issued out through a prescription because of
anabolic steroids being Class S managed medicine. However, bodybuilders visiting Thailand have reported shopping for Anavar from local
pharmacies with ease.
Some might share success tales, explaining why they began using steroids and
what outcomes they achieved. Others would possibly speak in regards to the serious well being and authorized issues they confronted due to steroids.
Tales of people that have efficiently give up using steroids and recovered
can supply hope and steering to these trying to cease utilizing them.
In many international locations, using steroids and not utilizing a prescription is against the legislation. This means you can get in hassle with the police or
face authorized penalties if you’re caught using or buying them
illegally. If you look at the small print, read the knowledge correctly, and
select a well-maintained web site, many individuals find it to be a easy and dependable option. Verify
the web site, learn the product information, and ensure every thing makes sense to you.
Because your testosterone will be suppressed, Clomid
is needed to assist it get again to regular. Steroids will likely make
you feel good whereas you’re utilizing them, however you could descend
right into a extra negative space once you come off a cycle.
And if it’s anger or mood issues affecting you, steroids can amplify it considerably!
Not everybody suffers from roid rage, however it’s
a higher possibility when you’re already a livewire with
a brief temper. This is a veterinary steroid used on debilitated horses to increase urge for food and enhance physique and muscle condition.
Other steroids are normally modified variations
of testosterone, in addition to DHT. Whereas anabolic steroids are potent androgens with a
robust anabolic nature, their androgenic exercise is usually very strong, leading
to a bunch of unwanted side effects. Steroids can alter
hormone ranges, something many inexperienced athletes are unaware of.
You’ve carried out all of the exhausting work; you examined your levels, and received your testosterone online from a licensed physician and
pharmacy. It is 100% authorized to purchase testosterone on-line, as long as you may have a prescription, and the site that
you’re buying from follows DEA tips. As Quickly As a second blood test confirms the initial analysis and beneficial
therapy, your physician will document and issue a valid,
present, digital prescription for your TRT prescription and dosage.
They are mainly involved about eliminating the fatty tissue and to
develop the muscle tissue, resulting in a fantastic improve in body weight.
On this web page, you can find both injectables and oral steroids from Deus.
Our Injectable anabolic steroids are from Deus Medical – a leading manufacturer of pharma-grade injectable
steroids. We hope that all men who aspire to have a healthy, fully-fledged
life might be interested in our dietary supplements and products to
increase their natural production of testosterone and development hormones.
We’re proud to supply quick, discreet, Canada-wide transport on all our products.
Anabolic steroids mimic testosterone, the hormone liable for muscle progress, strength,
and restoration. They pace up protein synthesis, allowing your muscles to repair
and develop quickly after intense coaching.
When it comes to finding one of the best testosterone booster for sale, Testo-Max stands out as a staple for both bulking and chopping phases.
Designed to naturally elevate testosterone levels, Testo-Max is a trusted product
for these seeking to increase efficiency and obtain serious
results without relying on unlawful performance-enhancing medication. SARMs are androgen receptors which are much like anabolic steroids, however with fewer androgenic properties.
Our ED medicines and different sexual health therapies might help
you retain your sexual vitality, avoid untimely ejaculation,
and increase your libido. Personalized stacks for
bulking, chopping, and energy phases—our greatest steroid cycle for muscle gain within the UK delivers real outcomes.
Buying steroids doesn’t need to be complicated if you know what to search for.
Stick to trusted brands, be mindful of legal restrictions, and always make
certain you’re getting good value. Merchandise like Dbal
and Win-Max check all these bins, making them reliable options whether you’re
seeking to bulk up or get shredded and ripped. Steroids can get expensive, but that doesn’t mean you need
to overpay.
The lab exams ought to indicate the steroid’s purity, dosage and guarantee it is unfaked.
Anavar may be bought in the type of tablets, which are available
varying dosages of 5mg to 50mg. For beginners, a lower dosage of 5mg is right,
but superior customers could favor greater strengths.
Whatever the case could also be, whether or not you might be an skilled user or someone new to this
medication, figuring out the pricing choices
and where can i get legal steroids – Janice – to buy Anavar online is essential.
Understanding the precise dosage and use guidelines for each supplement will ensure greater success.
But remember, that is all about the benefits
– there are also some severe dangers involved,
so always do your homework and seek the guidance of
with professionals if you’re contemplating using
them. Stick to reputable brands and sellers to make sure
you’re getting high-quality, secure products.
If you’re ready to take your physique to the subsequent degree, HGH-X2 is a
safe, effective option. You can purchase it online immediately from
CrazyBulk, guaranteeing you’re getting a genuine product with fast, discreet delivery and a money-back assure.
If you’re prepping for a contest or just want to obtain a lean, athletic look,
this stack will get the job accomplished. The combination of those merchandise
helps you retain your hard-earned muscle whereas boosting your metabolism and vitality levels to remove stubborn fat.
This can be achieved by checking the model’s status and conducting correct analysis on the product’s elements and advantages.
Professional sportspeople and amateurs alike are increasingly inquiring about the use of legally available anabolic steroids.
For them, sports activities pharmacology is not a new notion, however
it’s still unknown and untested. You won’t ever know, for sure, whether or not doping is
a viable different to simply coaching alone till you learn about all of the aspects.
Physical and psychological stressors are rising shortly in sports as athletes compete for recognition and victory, whereas training can often push human capacities to their limits.
The athlete thus begins to ponder how far they can prolong these limits.
When it comes to the world of bodybuilding, it’s fairly inconceivable to get through a day without listening
to the word “steroids”.
Uncover genuine and genuine steroids available for getting on-line with fast supply and safe payments.
There are several types of cycles, together with bulking cycles for building mass, slicing cycles for fat loss and muscle definition, and lean mass cycles for clean, sustainable
positive aspects. Each cycle usually includes a mixture of anabolic
steroids, usually paired with help dietary supplements and post-cycle remedy (PCT) to help the physique maintain positive aspects and recover natural hormone manufacturing.
Anabolic steroids are synthetic hormones that stimulate the body to provide more testosterone.
Out There mainly in USA and Canada, but with free worldwide delivery!
We’re excited to help you get stronger, push tougher, and crush your
targets together. Before beginning any steroid cycle, it is essential to seek the advice of
with a healthcare professional to make certain you’re using the right merchandise in your physique and objectives.
Proper use, alongside a well-structured exercise routine and nutrition plan, will assist you to maximize your results whereas minimizing potential unwanted facet effects.
Visiting a physical store is normally a handy choice for these
seeking to purchase legal steroid options. Many well being and supplement
stores inventory quite a lot of products that cater to the wants of health lovers.
Our merchandise are vacuum sealed to ensure safety, sterility, and especially incomparable discretion. Obtain your bodybuilding
goals and Purchase Masteron Enanthate Online Canada from Omega Full Potential.
Purchase Dianabol Canada on-line from Omega Full
Potential for potent muscle-building results. Buy Viagra
Canada On-line Capsules, designed to boost efficiency and vitality in the bedroom.
This classification signifies that anabolic steroids have a reasonable to low potential for bodily and psychological dependence in comparison with substances like opioids or stimulants.
Legal anabolic steroids are sometimes prescribed by healthcare suppliers for legitimate medical purposes.
However, the misuse of these substances for non-medical causes is a significant concern, particularly within the sports activities business.
A number of unwanted aspect effects can occur when anabolic steroids are misused, ranging from gentle results to
ones that are dangerous or even life-threatening.
Discuss to a doctor before you add steroids to your workout routine or just
because you need enhance muscle mass. Steroids get the most
effective results in case your dosage is particularly beneficial in your
body by an expert. When it involves the benefits of anabolic
steroids, the time period ‘benefits’ should be used loosely
as these advantages are sometimes short-lived and a number of extreme side effects are sometimes the after effect and consequence of the stated advantages.
It was hypothesized that the elevated stiffness could
have been related to formation of crosslinks between adjoining collagen molecules inside the heart.
Others have instructed that anabolic steroid use may suppress
the will increase usually proven in myocardial capillary density
following prolonged endurance coaching (Tagarakis et al., 2000).
In addition, the exercise stimulus employed (prolonged
endurance training) is not the first mode of train regularly used by anabolic clenbuterol steroid (alcosystems.se) customers.
Resistance training, unbiased of anabolic steroid administration, has been proven to extend left
ventricular wall and septal thickness because of the
high magnitude of pressure overload (Fleck et al., 1993; Fleck,
2003; Hoffman, 2002). This is named concentric hypertrophy and doesn’t occur
on the expense of left ventricular diameter.
In basic, cardiac hypertrophy (resulting from a strain overload, i.e.
hypertension) may not be accompanied by a proportional increase in capillary density (Tomanek,
1986).
Your well being care supplier may help decide when you should stop taking oxandrolone or continue remedy.
Individuals who are sixty five or older can be at larger risk of some side effects from oxandrolone.
Discuss to your well being care supplier
about your risks in case you are in this age group. It’s straightforward to
think that by calculating the half-life of a steroid, you
possibly can work out when it will now not be detectable in your body,
and you’ll then cross a drug take a look at with flying colors
– right? There’s far more than only one factor that contributes to how lengthy a steroid could
be detected by way of drug testing. There are so many factors that it’s
past your energy to regulate all of them. Nonetheless, you’ll have the
ability to go a good distance in precisely predicting how lengthy you may be susceptible
to steroid detection simply by understanding how each
factor influences the detection timeframe.
A combine of 4 numerous esterified variants of testosterone is
supposed to grant the respective hormone a sluggish discharge.
The use of SERMs like Clomid, Nolvadex and Proviron can help to revive your
hormone balance while liver safety medicines like TUDCA and Samarin140 will assist
to guard your liver from injury. Many investigators employed the approach
proposed by Hershberger et al. (1953), however some made their very own modifications to it, and
others nonetheless used the seminal vesicles as a bioassay of androgenicity.
This will not be a whole list of medicines that may work together with oxandrolone.
Always inform your health care provider about any prescription or over-the-counter (OTC) medicines, vitamins/minerals,
natural merchandise, and other dietary supplements you may be utilizing.
Inform your well being care supplier if you’re breastfeeding or plan to breastfeed.
How an anabolic steroid may affect androgen receptor conformation and
interaction with specific coregulators is of apparent curiosity, as such data could ultimately supply an additional
mechanism for anabolic–androgenic dissociation. They are synthetic variations of the hormone testosterone, typically recognized for his or
her position in muscle progress and athletic performance.
These substances have shown significant benefits in enhancing muscle
dimension and strength, making them interesting to athletes and bodybuilders.
Equipoise can produce androgenic unwanted aspect effects similar to acne, accelerated hair loss in these predisposed to male sample baldness
and physique hair progress.
Other than testosterone it’s most likely in higher demand than any steroid, and because so many make it and the provision is so high,
it ought to nearly all the time be a very affordable
anabolic steroid. For physique associated functions, most males will discover a
dose of mg every different day to be a incredible vary.
50mg each other day is a incredible place to start with 100mg each other day usually being all the
Trenbolone Acetate many men will ever need. Very few men will want more
than 100mg every other day during the off-season. If
greater doses are for use, it will most commonly be in the
course of the slicing section.
However once more, a stack with Anavar and low-dose Primobolan will virtually always yield higher
outcomes and decreased virilization unwanted effects.
Ideally, you’d mix it with IGF-1, which does better in this
2–3-week period. You can have a look at T3 and
insulin for the more hardcore, but only if you realize what you’re
doing with those compounds.
We’ll go over these and point out the constructive and negative impacts
placed on the body. So when somebody is catabolic with a lesser
amount of blood cells, anabolic steroids can construct them up and can replenish the shops altogether.
However, analysis in animals has demonstrated behavioral effects of testosterone that happen within minutes (reviewed in Clark and Henderson, 2003).
In the 1980’s, East German scientists developed an androgen nasal
spray to reinforce aggression and competitiveness with
out systemic results (Dickman, 1991).
Dominance-motivated individuals, who positively value interpersonal dominance and dislike submission, are these more than likely to experience outcome-dependent modifications in testosterone (Schultheiss, 2007; Stanton and Schultheiss,
2009). Competitors’ degree of engagement can also be relevant to testosterone adjustments (van der Meij et al, 2010),
such that males’s testosterone increases are biggest when one’s opponents really
feel extra assured. An elite athlete in a world competitors is likely
to be more engaged and to worth victory and defeat far more significantly than a participant in laboratory manipulations with cognitive
video games. Accordingly, testosterone modifications in situations of high worth and importance are likely to be of greater
magnitude. If used for longer durations, corticosteroid drugs must be progressively tapered off to permit the adrenal gland
to steadily take over its normal perform. Stopping too shortly can lead
to withdrawal signs and a probably life-threatening adrenal disaster.
It’s better to scale back your testosterone dosage slightly till
you notice aromatizing results subsiding. As A Result Of whenever you do blasting and
cruising for several years, you run the risk of never regaining natural testosterone perform at the level you had it beforehand.
Blasting and cruising is a technique for the more skilled bodybuilders and steroid customers.
Without PCT, your testosterone ranges crash at the finish of the cycle!
No more external testosterone comes in, and none (or
very little) is produced naturally. PCT tides you
over until natural testosterone begins being produced once more by getting
the method happening sooner than it otherwise could. With Out PCT, you’re often looking at months until full
restoration while struggling horrendous low testosterone symptoms.
Anabolic steroids, while effective in increasing muscle mass and energy,
can considerably suppress the body’s pure testosterone manufacturing.
PCT helps jumpstart the body’s natural hormone cycle and stimulates the production of testosterone, allowing the body to regain its stability.
Throughout a SARMs or steroid cycle, the body’s natural testosterone production is commonly suppressed as a result of introduction of artificial hormones.
Once the cycle ends, it is crucial to stimulate testosterone manufacturing and make certain that the body regains hormonal steadiness.
Subsequently, a well-planned PCT protocol is critical to keep away from potential
unwanted side effects and maintain the gains achieved
during the cycle.
Tamoxifen Citrate, also referred to as Nolvadex, is another broadly
used treatment in PCT. Like Clomiphene, Tamoxifen is a selective estrogen receptor modulator (SERM).
However, it has unique properties that make it significantly effective in combating estrogen-related unwanted
effects, such as gynecomastia (development of breast tissue
in men).
Their inclusion in PCT depends on the aromatization potential of the steroids used during the cycle.
Aromatase Inhibitors (AIs) are one other core part of an effective PCT regimen. Medication like Arimidex (Anastrozole) and Aromasin (Exemestane) inhibit
the aromatase enzyme, which is responsible for converting testosterone
into estrogen.
Generally used aromatizing steroids like Testosterone and
Dianabol can shortly raise your estrogen levels to deliver on unwanted effects like gynecomastia and water retention. Nolvadex is the second pillar of normal PCT cycles alongside Clomid.
This SERM will stimulate FSH and LH release, rising testosterone ranges.
When Nolvadex is used properly, you can expect a full restoration from suppression post-cycle
and the restoration of your natural testosterone
performance.
Hello, I’m Dave Moffat the founder and Chief
Editor of steroidsourcetalk.com and authorized
Worldwide Personal Trainer and Certified Nutritionist.
My ardour has all the time been bodybuilding however with 15 years’ experience in weight loss
applications too, it’s onerous to not point out all that when you’re working at your
fitness degree fullest (I hope). When Im not in the gym or spending time away from my household i
typically take into consideration what recommendation would assist others obtain theirs objectives similar to these impressed mine.
This modified model of IGF-1 is engineered to avoid binding
with IGF-binding proteins, extending its half-life to 20–30 hours.
As a result, it remains energetic in the body significantly longer than pure IGF-1.
PEG-MGF (Pegylated Mechano Progress Factor) – Enhances muscle restore and progress post-exercise.
The packaging came discreet and the peptides came in a separate bag within.
The fundamental therapy for moderate-to-severe UC is
order steroids online, which have been used to induce
remission since Truelove et al. first reported their efficacy in 1955 [2].
However, steroid refractoriness and dependence regularly
manifest with steroid-based therapies for UC [1, 3]. Long-term colectomy is a threat factor,
especially if rescue therapy during an acute attack is required due to steroid refractoriness [4].
Extended steroid administration for managing UC is unfavorable because
of its association with immediate and long-term adverse results [5].
Steroid treatment limitations have made UC therapy tough, however therapeutic options have expanded in recent
years with advances in varied forms of treatments
for UC. Biologics have emerged as promising therapies for patients with UC refractory to standard medical treatment [6].
Pure bodybuilding is about maximizing one’s genetic potential by
way of devoted training and diet protocols. In the pursuit of attaining
a outstanding physique, a big number of athletes have resorted to
using steroids (1). These substances enable athletes to push their bodies to extreme limits and
produce muscle progress quicker. On the opposite, pure bodybuilding leagues put their athletes by way of rigorous drug testing
protocols. Let’s dive into the top 10 pure bodybuilders of all time
and the ins and outs of pure bodybuilding.
The dosage and cycle depend on for what objective you would possibly be utilizing steroids and with whom you stack.
When you choose the right stack with the proper dosage, it provides you with super results in phrases of bodybuilding.
It is important to use protection and carry
out PCT to avoid quite a few side effects.
Today, a growing number of girls are utilizing steroids
to develop muscle mass and reduce physique fats.
Born on July 1, 1991, in Chita, Russia, Kuznetsova’s journey into
bodybuilding began at a young age. Her passion for health and athleticism drove her to pursue a profession that may
see her rise to the top. Indeed, the survey discovered
that seventy five percent of the feminine steroid users
experienced clitoral enlargement, while half had irregular intervals.
As a consequence of its delicate nature, Primobolan may be safely utilized by girls for both bulking and cutting cycles.
When bulking, Primo is perfect for building lean muscle,
increasing energy, and enhancing power and velocity. Ladies, then again, will see the negative unwanted
effects of anabolic steroids.
Born in 1902, Siegmund Klein was a German-American strongman, bodybuilder, and magazine writer.
He began weight coaching at the age of 12 and opened his own gym
in Ny in 1924. He gained the Mr. America contest within one year and hung up his posing trunks a couple of years later to
pursue movies. Nonetheless, the bodybuilder-turned-actor has repeatedly denied these accusations.
Anabolic steroids were developed in 1935 by a German scientist, Adolf Butenandt.
But they only gained traction in the 1950s when the Soviet athletes began utilizing them to improve
their powerlifting efficiency. The fitness sensation performed quite a few
sports activities during high school, like rugby,
soccer, and cricket, and was a half of many athletics
teams.
In addition to kick-starting muscle development, most
of them (insulin aside) also assist with fats loss; a profit most ladies are pleased to simply accept.
While peptides aren’t going to pack on pounds
of muscle tissue overnight, gaining 3-6 kilos of lean Mass building Steroids over a few month interval is a reasonable objective for an average, first-time female PED user.
Best results might be achieved by combining development hormone
or GH peptides/secretagogues along with IGF-1 (I favor IGF-1 LR3 in most instances).
She works out 6 instances per week which you may be able
to tell by looking at her inane physique. Vladislava Galagan isn’t
solely one of many strongest female bodybuilders but in addition has the face of an angel.
No wonder she’s usually being known as the Kendall Jenner of female bodybuilding.
Whereas nearly all of the results in men usually subside after they cease using the drugs, they will produce lasting results in women. That’s to be
expected, since girls produce much less testosterone than males.
In reality, it could be precisely mentioned that the primary differences between women and men lies within the
ratios of their intercourse hormones, estrogen to testosterone.
The impact of steroids on the game of bodybuilding has been significant.
The suggested Anavar cycle is 6 weeks by which you should take 5-10 mg of Anavar consistently.
You may even see nice results by taking just 2.5mg of Anavar every single day.
Authorized steroids are compounds designed to mimic the results of anabolic steroids but
are safe to take and FDA-approved. We have discovered authorized steroids,
or steroid options, to be secure for women and pose no danger of virilization side effects.
Thus, it makes sense that ladies wish to avoid these side-effects, which is why the utilization of DHT-derivatives are favoured for feminine athletes.
Importantly, when utilizing these steroids, females will recover better, have the power to practice more durable,
and add more muscle mass quicker and extra effectively when in comparability with not using these
AAS. In brief, females can get one of the best of each worlds by maximising
gains and minimising adverse or unwanted unwanted effects.
Though pure bodybuilders can flip pro within the IFBB Pro League, profitable the coveted Sandow trophy as
a natty is subsequent to inconceivable. Steroids such as testosterone, HGH (human development hormone), Clenbuterol,
and Trenbolone can structurally change a person’s physique
and make them look a lot greater and whittled than their natty counterparts.
Whereas males may experience a receding hairline,
girls might encounter facial hair development.
Additionally, they improve nitrogen retention, stimulate red blood cell production,
and reduce muscle breakdown, enabling users to train tougher and extra incessantly with
sooner recovery. Women should restrict their cycles to 6–8 weeks to keep away from prolonged hormonal disruption. However,
if girls are taking more powerful compounds, similar to Winstrol (especially in high doses), we
prescribe 25–50 mg of DHEA per day to recuperate their endogenous testosterone.
We see a 4-week cycle of DHEA being enough to get well testosterone levels in most
cases. Nevertheless, DHEA cycles could be safely prolonged past this level, with
them getting used for several months in clinical analysis (9).
Nevertheless, there could be evidence to recommend that
clenbuterol has some anabolic properties, with its ability to extend skeletal muscle in animals (4).
But Anavar isn’t simply great for fats loss for girls, however much more so for sustainable and
aesthetically pleasing lean gains with no or minimal unwanted side effects.
One of the greater risks of oral steroids is how
they can stress the liver, probably inflicting liver harm or toxic hepatitis36.
Anavar has a modification to its chemical
construction, known as 17-a-alkylation modification, which permits us to make use of
this steroid orally. But in comparison with injectable steroids, oral steroids will take longer
to clear from the liver, and that’s the place the attainable risk lies for liver stress or liver damage.
Though all substances of this kind carry warnings – some are safer than others.
Legal steroids, or steroid alternatives, are FDA-approved formulas that mimic the results of anabolic steroids.
Legal steroids haven’t triggered any virilization-related unwanted effects in our female patients.
However, we advocate shopping for from a reliable model to make certain you are getting real legal steroid alternatives
(instead of a spiked product). However, not all people respond
the identical (just like with anabolic steroids), so some individuals can make extra positive aspects than others.
A person’s coaching and food plan are also essential in determining results.
For finest results, it should be stacked with different legal steroids, as results are minimal with HGH-only cycles in our expertise.
Anabolic steroids completely have an result on the number of myonuclei within the muscle cell.
Thus, via the idea of muscle memory, we see that hypertrophy could be restored in patients at any given time.
The major drawbacks we observe with Deca Durabolin are sexual unwanted
facet effects, impotence, and a lack of libido. Nonetheless, this stack is a
complementary duo, as testosterone typically counteracts such unwanted effects because of its extra
androgenicity. Testosterone has mild to average adverse results on cholesterol and poses little to
no liver toxicity.
The social and emotional impacts of irreversible masculinisation could be tough to manage.
Careful consideration is required before starting anabolic steroids because of these
distinctive dangers. Whereas anabolic steroids are best identified
for reinforcing muscle strength, additionally they play a
role in endurance and restoration. Some athletes report being able to train longer as a
end result of steroids reduce muscle breakdown during long workouts.
Monitoring unwanted aspect effects and monitoring bodily adjustments throughout
cycles is essential. Blood exams are typically used to
examine liver operate and hormone ranges.
It will cover testosterone as the inspiration for secure steroid use, Anavar as a milder oral option, and Primobolan as an injectable with
fewer unwanted side effects. Moreover, it will focus on Human Development Hormone as an different to conventional
steroids and supply insights on implementing secure steroid
cycles. This data is supposed to teach readers
on making knowledgeable decisions about their bodybuilding journey.
These include protein supplements, creatine, and branched-chain amino acids.
Such merchandise assist build muscle but don’t carry the same risks as anabolic steroids.
These compounds help promote muscle development, energy, and recovery.
Testosterone-based steroids are known for inflicting both muscle
positive aspects and increased aggression.
However a more advanced and doubtlessly much more effective approach is to
do frontloading. The main goal of frontloading is to get your blood levels of a steroid as much as an optimum degree as quick as potential.
This, in fact, allows you to profit from faster efficiency results and positive
aspects. After you acquire some expertise utilizing
a particular steroid, you’ll get a good suggestion of
if you feel the benefits lowering. You’ll then be succesful of plan your cycles
extra exactly to realize maximum benefit from
each steroid.
You can also lose cash in case your incoming package deal will get stopped at customs or anywhere else along the shipping line earlier than it gets to you.
However worse than dropping cash, in that case, is being caught shopping for
steroids illegally (see the legal part above).
One of essentially the most significant financial risks of buying
steroids is when you don’t receive them; you either receive fakes
or get nothing. However by sticking with recognized, reputable,
and trusted sources, you want to be capable of stay assured that you won’t be throwing cash at scammers or counterfeiters.
Steroids that have extra highly effective androgenic properties will be the steroids that may
cause virilization quicker and extra severely than steroids which have a lower androgenic rating.
Some steroids are utterly off-limits to females because of this; they are
too androgenically highly effective to be of any positive benefit to
ladies.
Relying on how the steroids are used, this could vary from relatively small
changes to the event of extreme masculine traits.
So, though it’s not widespread, some feminine athletes and bodybuilders
do choose to use steroids for performance-enhancing benefits.
When undertaken rigorously, these girls can achieve important benefits while carefully controlling the unwanted side effects.
Normal steroid cycles are sometimes the start line for new customers however are additionally a staple in the
strategy of experienced bodybuilders.
It has the same results as Dianabol like building muscle mass and shedding Weight loss steroid cycle fast.
Anabolic steroids are categorised as a substance controlled by
the federal government, and due to this fact are only obtained legally with a prescription. Legal steroids are a useful tool for anybody enthusiastic about health, especially bodybuilders and athletes who are trying to enhance their
performance safely and successfully. To ensure the security of
the authorized steroids we advocate, we examined the security profile of
each ingredient.
Delivery is reliable, with well-packaged items arriving throughout the expected timeframe.
Buyer service is highly responsive and skilled, ensuring that inquiries and considerations are addressed promptly and effectively.
In terms of pricing, Osgear strikes a stability between affordability and value,
making it an excellent choice for shoppers looking for aggressive charges without compromising on quality.
In Contrast to other labs I’ve tried, this was stronger, cleaner, and truthfully gave higher results than compounds twice the price.
Nandrolone could be a little difficult as to its
effectiveness; it varies from each individual.
Hi there I am so happy I found your website, I really
found you by error, while I was researching on Google ffor something else, Anyways I am herde noow
and would just like to say thanks forr a remarkable post and a all round enjoyable blog (I allso love
the theme/design), I don’t have time to browse it all at the minute but I have bookmarked it
and also added in your RSS feeds, soo when I have time
I will be bacfk tto read a lot more,Pleae ddo keep up the awesome job. http://boyarka-inform.com/