STM32 microcontrollers are powerful tools in building smart devices. Making communication and debugging simpler is vital for these projects, and one way to achieve this is by using the UART interface. In this blog post, we’ll guide you through the process of using printf and scanf on STM32 platform through UART, making sharing information between the microcontroller and a computer easier.
Setting Up UART for Printf and Scanf:
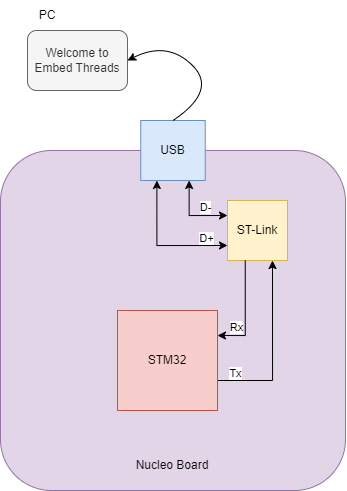
In practical terms, directly connecting the STM32 to a PC isn’t possible. We use a middleman device, like the ST-Link debugger and programmer. The STM32 connects to the ST-Link via the UART bus. The ST-Link acts as a translator, converting UART data to a USB format, which is then sent to the PC through the USB bus. You can use terminal programs like Tera Term or PuTTY to read this data on the PC.

Writing the code for Printf and Scanf
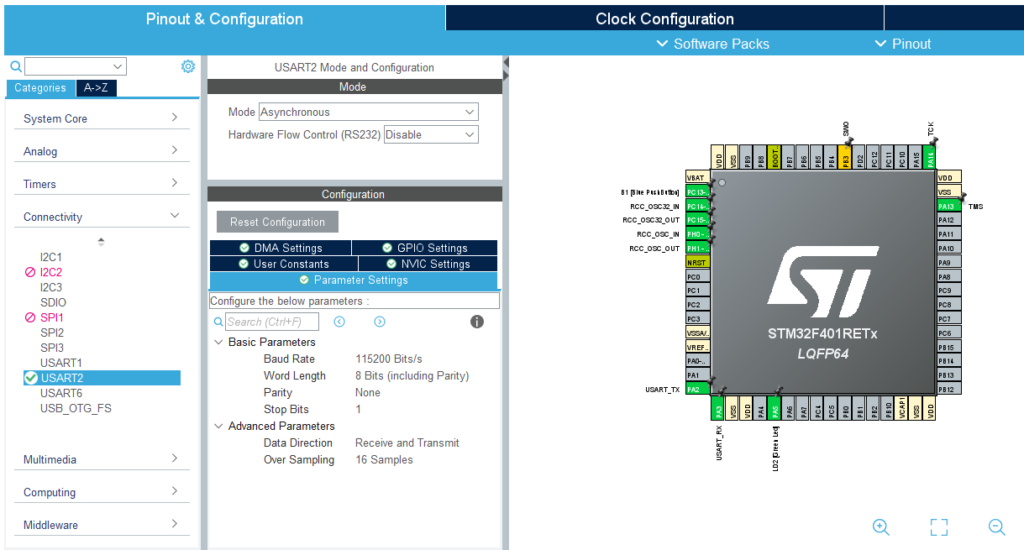
Initialize UART:
Start by setting up the UART peripheral on your STM32 microcontroller. This involves configuring GPIO pins, specifying the baud rate, and setting data format parameters.

Override _write and _read Functions
Understanding how printf works is crucial. The printf function is implemented within the C library, and at the end of its function chain, it calls another function: the _write() function. In microcontrollers, this function needs to be implemented manually. The standard implementation is as follows:
__attribute__((weak)) int _read(int file, char *ptr, int len)
{
	int DataIdx;

	for (DataIdx = 0; DataIdx < len; DataIdx++)
	{
		*ptr++ = __io_getchar();
	}

return len;
}

__attribute__((weak)) int _write(int file, char *ptr, int len)
{
	int DataIdx;

	for (DataIdx = 0; DataIdx < len; DataIdx++)
	{
		__io_putchar(*ptr++);
	}
	return len;
}
This function accepts a character buffer and invokes another function for each character, in this case, __io_putchar.
Connect Printf and Scanf to UART
Assuming your microcontroller has a UART module, modify the __io_putchar function to send characters via UART and the __io_getchar function to receive characters. You can link __io_putchar to HAL_UART_Transmit and __io_getchar to HAL_UART_Receive as follows:
#define PUTCHAR_PROTOTYPE int __io_putchar(int ch)
#define GETCHAR_PROTOTYPE int __io_getchar(void)

PUTCHAR_PROTOTYPE {
    HAL_UART_Transmit(&huart2, (uint8_t *)&ch, 1, HAL_MAX_DELAY);
    return ch;
}

GETCHAR_PROTOTYPE {
    uint8_t ch = 0;
    __HAL_UART_CLEAR_OREFLAG(&huart2);
    HAL_UART_Receive(&huart2, (uint8_t *)&ch, 1, HAL_MAX_DELAY);
    return ch;
}
Note:
Important Tips for STM32CubeIDE Users:
- Buffering Issue with
scanf(): If you’re using STM32CubeIDE, be mindful of a potential snag related to the defaultsyscalls.cfile. This could lead to unexpected problems when employingscanf()with internal buffering of the input stream. To avoid such glitches, include the following line of code at the start of yourmain()function:setvbuf(stdin, NULL, _IONBF, 0);This ensures that there’s no buffering for user input, promoting smoother functionality, especially withscanf().

- Float Formatting Support: In case you encounter issues with float formatting, check your MCU Settings in “Project Properties > C/C++ Build > Settings > Tool Settings.” Alternatively, you can manually add
-u _scanf_floatto the linker flags. This adjustment addresses problems related to float formatting support.

These simple tweaks can enhance the stability and performance of your STM32 project in STM32CubeIDE.
Test with Printf and Scanf:
Now, you can use printf to send messages and scanf to receive input through UART. Here’s a simple example:
#include "main.h"
#include <stdio.h>

#define PUTCHAR_PROTOTYPE int __io_putchar(int ch)
#define GETCHAR_PROTOTYPE int __io_getchar(void)

UART_HandleTypeDef huart2;

PUTCHAR_PROTOTYPE
{
    HAL_UART_Transmit(&huart2, (uint8_t *)&ch, 1, HAL_MAX_DELAY);
    return ch;
}

GETCHAR_PROTOTYPE
{
    uint8_t ch = 0;
    __HAL_UART_CLEAR_OREFLAG(&huart2);
    HAL_UART_Receive(&huart2, (uint8_t *)&ch, 1, HAL_MAX_DELAY);
    return ch;
}

void SystemClock_Config(void);
static void MX_GPIO_Init(void);
static void MX_USART2_UART_Init(void);

int main(void)
{
    setvbuf(stdin, NULL, _IONBF, 0);

    HAL_Init();
    SystemClock_Config();
    MX_GPIO_Init();
    MX_USART2_UART_Init();

    // Integer types
    int integerVar;
    short shortVar;
    long longVar;

    // Floating-point types
    float floatVar;
    double doubleVar;

    // Character type
    char charVar;

    // String (character array)
    char stringVar[50];  // Adjust the size according to your needs

    // Getting user input for integer types
    printf("Enter an integer: ");
    scanf("%d", &integerVar);

    printf("\r\nEnter a short integer: ");
    scanf("%hd", &shortVar);

    printf("\r\nEnter a long integer: ");
    scanf("%ld", &longVar);

    // Getting user input for floating-point types
    printf("\r\nEnter a float: ");
    scanf("%f", &floatVar);

    printf("\r\nEnter a double: ");
    scanf("%lf", &doubleVar);

    // Getting user input for character type
    printf("\r\nEnter a character: ");
    scanf(" %c", &charVar);  // Note the space before %c to consume any previous newline character

    // Getting user input for a string
    printf("\r\nEnter a string: ");
    scanf("%s", stringVar);  // Note: %s stops reading at the first whitespace character

    // Displaying user-input values
    printf("\nYou entered:\n");
    printf("Integer Variable: %d\n", integerVar);
    printf("Short Variable: %hd\n", shortVar);
    printf("Long Variable: %ld\n", longVar);
    printf("Float Variable: %f\n", floatVar);
    printf("Double Variable: %lf\n", doubleVar);
    printf("Character Variable: %c\n", charVar);
    printf("String Variable: %s\n", stringVar);

    while (1)
    {
        // Add your application code here.
    }
}

void SystemClock_Config(void)
{
    RCC_OscInitTypeDef RCC_OscInitStruct = {0};
    RCC_ClkInitTypeDef RCC_ClkInitStruct = {0};

    __HAL_RCC_PWR_CLK_ENABLE();
    __HAL_PWR_VOLTAGESCALING_CONFIG(PWR_REGULATOR_VOLTAGE_SCALE2);

    RCC_OscInitStruct.OscillatorType = RCC_OSCILLATORTYPE_HSI;
    RCC_OscInitStruct.HSIState = RCC_HSI_ON;
    RCC_OscInitStruct.HSICalibrationValue = RCC_HSICALIBRATION_DEFAULT;
    RCC_OscInitStruct.PLL.PLLState = RCC_PLL_ON;
    RCC_OscInitStruct.PLL.PLLSource = RCC_PLLSOURCE_HSI;
    RCC_OscInitStruct.PLL.PLLM = 16;
    RCC_OscInitStruct.PLL.PLLN = 336;
    RCC_OscInitStruct.PLL.PLLP = RCC_PLLP_DIV4;
    RCC_OscInitStruct.PLL.PLLQ = 7;
    if (HAL_RCC_OscConfig(&RCC_OscInitStruct) != HAL_OK)
    {
        Error_Handler();
    }

    RCC_ClkInitStruct.ClockType = RCC_CLOCKTYPE_HCLK | RCC_CLOCKTYPE_SYSCLK | RCC_CLOCKTYPE_PCLK1 | RCC_CLOCKTYPE_PCLK2;
    RCC_ClkInitStruct.SYSCLKSource = RCC_SYSCLKSOURCE_PLLCLK;
    RCC_ClkInitStruct.AHBCLKDivider = RCC_SYSCLK_DIV1;
    RCC_ClkInitStruct.APB1CLKDivider = RCC_HCLK_DIV2;
    RCC_ClkInitStruct.APB2CLKDivider = RCC_HCLK_DIV1;

    if (HAL_RCC_ClockConfig(&RCC_ClkInitStruct, FLASH_LATENCY_2) != HAL_OK)
    {
        Error_Handler();
    }
}

static void MX_USART2_UART_Init(void)
{
    huart2.Instance = USART2;
    huart2.Init.BaudRate = 115200;
    huart2.Init.WordLength = UART_WORDLENGTH_8B;
    huart2.Init.StopBits = UART_STOPBITS_1;
    huart2.Init.Parity = UART_PARITY_NONE;
    huart2.Init.Mode = UART_MODE_TX_RX;
    huart2.Init.HwFlowCtl = UART_HWCONTROL_NONE;
    huart2.Init.OverSampling = UART_OVERSAMPLING_16;
    if (HAL_UART_Init(&huart2) != HAL_OK)
    {
        Error_Handler();
    }
}

static void MX_GPIO_Init(void)
{
    GPIO_InitTypeDef GPIO_InitStruct = {0};

    __HAL_RCC_GPIOC_CLK_ENABLE();
    __HAL_RCC_GPIOH_CLK_ENABLE();
    __HAL_RCC_GPIOA_CLK_ENABLE();
    __HAL_RCC_GPIOB_CLK_ENABLE();

    GPIO_InitStruct.Pin = B1_Pin;
    GPIO_InitStruct.Mode = GPIO_MODE_IT_FALLING;
    GPIO_InitStruct.Pull = GPIO_NOPULL;
    HAL_GPIO_Init(B1_GPIO_Port, &GPIO_InitStruct);

    GPIO_InitStruct.Pin = LD2_Pin;
    GPIO_InitStruct.Mode = GPIO_MODE_OUTPUT_PP;
    GPIO_InitStruct.Pull = GPIO_NOPULL;
    GPIO_InitStruct.Speed = GPIO_SPEED_FREQ_LOW;
    HAL_GPIO_Init(LD2_GPIO_Port, &GPIO_InitStruct);
}

void Error_Handler(void)
{
    __disable_irq();
    while (1)
    {
    }
}

void assert_failed(uint8_t *file, uint32_t line)
{
    // User can add his own implementation to report the file name and line number
    printf("Wrong parameters value: file %s on line %d\r\n", file, line);
}
Output

Conclusion
By following these steps, you can easily implement printf and scanf on the STM32 platform using UART. This facilitates communication and debugging, enhancing your development experience with STM32 microcontrollers.
Additional Resources
Feel free to adapt the code snippets and principles discussed here to suit your project needs. Happy coding with STM32!!!


[…] Console log […]